How To Install Uni Mat Pro
Blanke UNI-Mat PRO Installation Instructions
The Universal Uncoupling Underlayment
Lightweight, labor saving
Crack isolation (uncoupling)
Equalize substrate vapor pressure
Absorption of stress from lateral substrate movement
Waterproof function
Installation: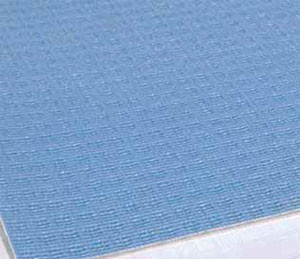
1. The substrate must be even, clean, and load bearing.
NOTE: Please refer to the 2005 Tile Council of America (TCA) Handbook for Ceramic Tile Installation for details.
The Blanke UNI-Mat PRO will not correct for substrate and installation deficiencies including but not limited to the following: structurally unsound substrates including
but not limited to those that exceed deflection limits;
substrates with surfaces not suitable for the particular
installation including but not limited to those that are not
flat or prepared according to the recommendations of
the TCA and the setting material manufacturer; wood
based substrates swollen, deformed or weakened by
excessive exposure to moisture; and substrates that are
improperly installed.
2. The type of thinset mortar used to apply Blanke UNIMat PRO must be appropriate for the substrate and in accordance with the manufacturers recommendations.
The thinset must both bond to the substrate and mechanically anchor the fleece on the underside of the Blanke UNI-Mat PRO to the substrate.
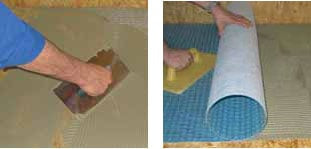
3. Mix the thinset to a more liquid than normal consistency.
Apply the thinset to the substrate using a 1/4 x 1/4 notched trowel. The direction in which the thinset is combed does not affect the adhesion or function of the Blanke UNI-Mat PRO. Periodically check for 100% contact of the fabric with thinset.
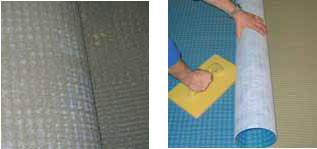
4. Cut sections from the Blanke UNI-Mat PRO roll to fit the area to be installed. Embed the fleece underside of Blanke UNI-Mat PRO into the thinset so that its entire surface is bonded. Be careful not to exceed the working time of the thinset. Use a float, screed trowel or vinyl roller to press the Blanke UNI-Mat PRO into the thinset. Start at one end and continue working in one direction to avoid air pockets.
It is recommended to slightly stretch the Blanke UNI-Mat PRO when initially positioning and aligning it.
This task works best with two people. Abut the sides and ends of individual sections trimming the edges if necessary to avoid gaps between the sections.
5. Immediately after the Blanke UNI-Mat PRO is installed, tiles can be set using the thin-bed method provided that work on the mat does not continue once the thinset has started to cure.
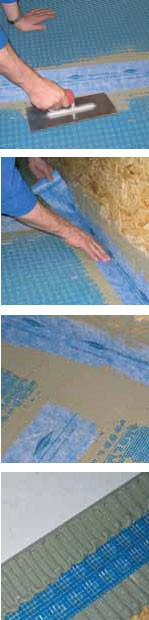
For most brands of thinset, this is 1-1.25 hours. In a small area, use the flatside of the trowel to work the thinset into the circular voids ensuring that the voids are completely filled.
Immediately apply a layer of thinset to the area using a notched trowel that is appropriate for the tile type and format.
Solidly embed the tiles in the setting material, making sure to achieve full coverage. Keep in mind the working time of the adhesive so as to achieve sufficient bond
6. Once installed, the mat must be protected against heavy loads to avoid loosening it from the substrate or other damage.
It is recommended to put boards down to protect the Blanke UNI-Mat PRO if the area needs to be accessed prior to installing the tile.
UNI-Mat PRO Installation Notes:
1. Blanke UNI-Mat PRO is not recommended for exterior applications because of freeze-thaw problems, efflorescence, and prolonged thinset cure times.
2. Minimum substrate thickness does not guaranteed floor is within deflection limits. (Ceramic = L/360; Stone = L/720).
Note: Backerboard does not add structural reinforcement to the substrate to prevent deflection. Minimum thickness of wood substrates for ceramic tile per the 2005 TCA Handbook for Ceramic Tile Installation:
16 o.c. joist spacing: 5/8
19.2 o.c. joist spacing: 3/4
24 o.c. joist spacing: 1 layer of 3/4 plus top layer of 3/8
3. In cold weather, it is recommended that the Blanke UNI-Mat PRO be room temperature when installed.
End of rolls may tend to curl ok to staple short end of sections to substrate.
4. Once the Blanke UNI-Mat PRO is installed on the substrate, it is important not to be working on the mat once the thinset has begun to cure. For most brands, this is 1 - 1.25 hours. For larger jobs where the tile will be installed at a later time, Blanke UNI-Mat PRO sections should be applied to substrate and the cavities on top filled in the same work period.
The tile can then be installed the next day. Traffic should be kept off the Blanke UNI-Mat PRO while the thinset is curing or boards placed over the installation to protect the mat before the tile is installed.
5. A general rule of thumb for which thinset to select when installing the Blanke UNI-Mat PRO: For the substrate, choose a thinset recommended by the thinset manufacturer for installing backerboard or tile on that particular substrate. (EX: dryset is acceptable for cement substrates) A mechanical bond is formed when the fabric under the mat absorbs the thinset that when cured, holds the system in place.
For the tile, select a thinset the manufacturer recommends for installation on backerboard for the particular type and size of tile and traffic loads anticipated. (EX: Latex modified for porcelain). The mesh on top of the mat forms a mechanical bond with the thinset that when cured holds the installed tile in place. As with any application, the better the thinset, the better the installation.
6. Blanke UNI-Mat PRO vs. Dovetailed Uncoupling Systems: Plastic mesh on top of the UNI-Mat PRO integrates with the thinset creating a higher tensile strength than that provided by the excessive dovetailing in the competing mat systems. Excessive dovetailing requires more thinset and weakens mat when tiled is being installed.
More collapsed squares = lower volume of thinset = weaker underlayment.
7. Importance of Movement Joints: Most claims for failures are for installations with insufficient or no movements joints. Here are the minimum guidelines per the TCA 2005 HANDBOOK For Ceramic Tile Installation:
Interior: 20-25 both directions
Interior exposed to sunlight: 8-12 both directions
Exterior: 8 12 both directions
Perimeter and where tile abuts vertical surfaces: 1/4 joint or gap
8. Press Blanke UNI-Mat PRO sections into thinset on substrate by using flat side of trowel. Move the trowel in one direction toward the opposite end of the section being installed to ensure the mat is flat with no air pockets and the fabric is well embedded in the thinset.
9. Allow proper cure time as recommended by the thinset manufacturer before grouting. (Ex: 24 hours cure time is not finishing setting the tile at 5:00 PM and returning to grout at 8:00 AM the next morning).
strong>10. Wood substrate panels should be gapped 1/8.
It is important that these gaps are not filled in with thinset so as to restrict expansion and contraction of the panels. Gaps can be protected by filling them in with movement joint sealant or covering with tape prior to applying the thinset to the substrate.
11. BlankeUNI-Mat PRO should not be installed under tile smaller than 4 x 4.
The Blanke UNI-Mat PRO may be water proofed by applying the Blanke AQUA SHIELD Tape over the seams of the Blanke UNI-Mat PRO section with thinset.
It is not intended that the Blanke UNI-Mat PRO be used to waterproof applications where standing water may accumulate over occupied space.
More links about Blanke Corporation
Blanke UNI-Mat PRO vs. Schluter Ditra - All about Blanke Permat - How to install UNI Mat Pro - How to install Blanke Permat - Blanke Permat Limited Warranty - Blanke SECURMAT Overview - Blanke SecurMat the Universal uncoupling underlayment