Recess It How To Install
Shower Recess Niches and more
Shelves Seat and more
Specifications
Products listed are produced of a corrosion resistant alloyed aluminum with an elastomeric-waterproofing and anti-fracture coating combined with an aggregate bonding base.
Finished materials, ceramic tile, marble, granite, etc. can be applied immediately after product installation utilizing standard mastics or thin-set. Listed products are supplied with wall fasteners which may be used with/without preinstalled wood blocking.
Also try our Floating Shelf™, a tile ready shelf support, for use with any Recess-It™ units.
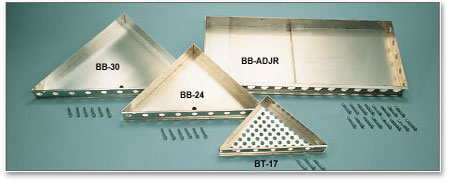
Better-Bench is manufactured in the U.S.A.
Products listed below are produced of an alloyed aluminum and are sent as one piece. All products are supplied with hollow wall anchors and wood screws. Fastening to studs, blocking, or other framing members is not required. If framing members are encountered, discard hollow wall anchor and use provided screw with an appropriate pilot hole.
Step by Step Installation Instructions
Step 1
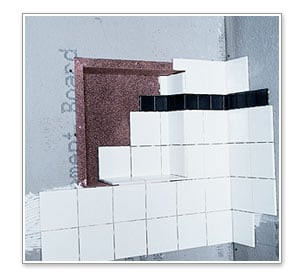
Place the unit level at desired location with flange away from surface. Care should be taken to position unit in a manner so as not to conflict with any structural wall framing members. Trace perimeter of Recess-It™ on substrate and place unit aside. Enlarge the marked layout by 1/2" on all sides and cut out substrate.
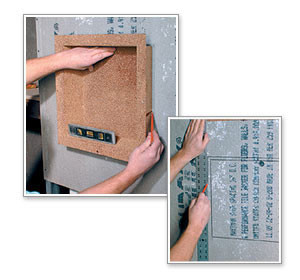
Step 2
Add a continuous bead of adhesive caulk on the back of mounting flange and secure it to the wall cavity with supplied wall fasteners. (Galvanized roofing nails may be substituted.) A power screwdriver may be used if a low resistance setting is available, otherwise...tighten all fasteners by hand and do not over tighten!
Thickness of Recess-It™ mounting flange should be minimized to provide a flush wall surface for the finish tile.
In some substrates, you may be able to grind the perimeter of the cut-out for the width and depth of the mounting flange prior to unit installation. Otherwise, install unit, and then by using a bonding material (thinset/mastic), "feather" the edge of the unit for a distance of 8"-12" and allow to set firm prior to continuing with finish tile placement.
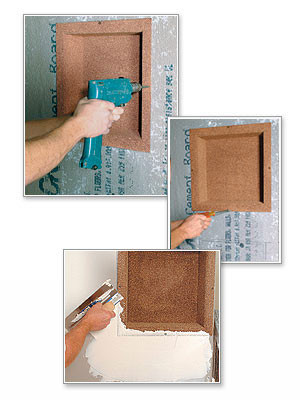
Step 3
Finish as desired using bonding products suitable for material being applied.
NOTE: All Recess-It™ products have a predetermined slope for the bottom surface. This may be reduced or enhanced by utilizing a thicker bed of bonding material at the front or rear of horizontal plane as necessary.
Do not adjust slope to angle backward towards rear of unit!
Step 4 (optional)
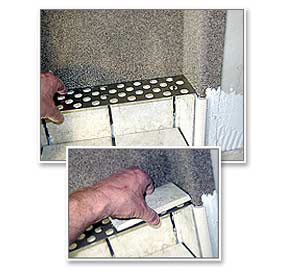
Place FLOATING SHELF™ directly on top edge of selected tile course. Apply surface bull nose tile (SBN) or other finish treatment to top and bottom of FLOATING SHELF™ by using thin-set or mastic to "sandwich" shelf unit. Allow front edge of applied tiles to extend 1/8 " minimum to allow for grout coverage of shelf.
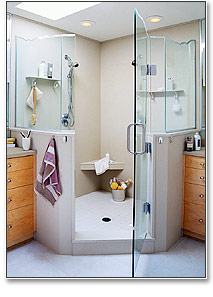
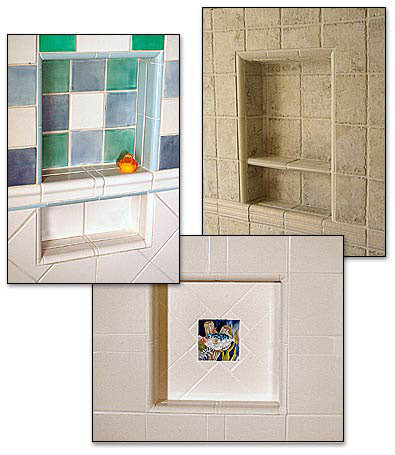
Finish Product
FAQ's about the Recess It Products :
Won’t the flange cause a bump in the tile?
The waterproofing flange is an important element that is unique to the Recess-It product line. It serves an important role in maintaining the waterproofing integrity of the wall. It is approximately 1/16 of an inch in thickness. It may cause a “bump” issue if not addressed properly. There are two basic methods available to minimize the thickness of the flange.
You can simply “feather” the edge of the Recess-It unit for a width of eight to ten inches by using the bonding material (thin-set/mastic) of the project and the smooth side of the trowel. Spread the bonding material around the entire perimeter of the unit after installation and allow to skin prior to setting tile.
If you are using a cementitious based substrate, you may flush set the unit by grinding down the substrate a 1/16 of an inch for the full width of the flange prior to unit placement.
If you are installing in fresh laid mortar place the bead of caulk on the back of the mounting flange and just press the unit into the mortar before it sets completely.
Do I have to install horizontal blocking?
It is not required to install horizontal blocking. The aluminum shell is structural and the supplied screws are designed to pull the substrate snug against the back of the mounting flange which will adhere it to the caulk placed on the back of the flange. You may easily add horizontal blocking if desired by placing the blocking after the cut-out for the Recess-It unit has been made. Secure each block in place with two (2) galvanized countersunk screws (1-5/8 galvanized gypsum screws work great!) placed at each end of the cut out under the mounting flange. The screws locations will then be covered and waterproofed by the mounting flange after final unit placement.
The bottom slope seems excessive. Why is that?
Recess-it products have a preset slope to ensure that any grout penetrating moisture cannot be retained inside the unit and cause mold and/or mildew development. The slope can actually be minimized by building up the thin-set or mastic thicker in the front to accommodate your specific installation need. Remember not to adjust the slope to the degree that it slopes toward the rear of the tiled unit.
You mention caulk in the instructions. Why?
A bead of caulk must be installed on the back of the mounting flange prior to unit placement. Any caulk may be used for this purpose since it is merely to act as a waterproofing gasket between the substrate and the unit.
Are Recess-It products waterproof and why don’t I need additional vapor barriers or water proofing membranes to protect the wall cavity?
Recess-it units are made of a structural, alloyed aluminum shell with a sprayed on elastomeric/waterproofing coating. The shell backing eliminates the possibility of membrane penetration, and the units vertical mounting and positive sloped bottom ensures no damming of water inside the unit causing any potential for leakage-period!
The variation of temperature between the air trapped in the wall cavity and the water from the shower head can cause condensation to develop where the temperature clash meets a solid surface or barrier such as waterproofing membranes, or non-breathable surfaces. The unique design of the Recess-It units allows it to be installed without any direct wood to unit contact. This eliminates any moisture buildup which can destroy the wood framing of the wall over time. The preset slope on the top and bottom of the Recess-It is also designed to route any possible condensation buildup on the shell to the lower front flange and away from fungus susceptible wood members either by direct contact or “drip off”.
What’s the “floating shelf”?
The floating shelf is a 1/16 inch thick, aluminum reinforcing unit, which is completely perforated with 1/2” holes. The shelf, when combined with surfacing tiles top and bottom, and the final grout, provides a structurally reinforced tiled shelf at the location the installer desires rather than a pre-set location dictated by the product manufacturer!
The floating shelf unit is sized to fit within the grout joint of the vertical wall tile placed inside the Recess-It. This allows the installer to align the shelf with the existing layout of the wall tile without compromise, time consuming tile cuts, or layout issues.
The floating shelf unit may be used with any Recess-It product. Even the 614 when mounted vertically (ideal for a leg shaving foot rest), can use the floating shelf for a divider (razor rest!) just by easily cutting the shelf piece in two with aviation/tin snips.
How do I bond the tiles to the shelf?
Standard thin-set or mastic is used to bond the tiles to each other rather than directly to the shelf. The 1/2” holes allow the bonding material from the tiles on one side of the shelf to penetrate the shelf and bond directly to the tiles on the other side of the shelf. This effectively causes the shelf to be “sandwiched” between the tiles which then acts as the reinforcing layer of the shelf once the grout completes the installation.
What type tile do I use on the shelf?
The easiest and most preferred trim tile for the shelf is “SBN” or surface bull nose tile. Many tile lines do not include SBN tile as a part of their standard trim selection. In these instances, you may choose to “back cut” the field tiles on a 45˚ and use a 1/4" round trim piece for the front edge. Another method you might consider is to thicken the shelf with a piece of cement board substrate material and use a coordinating accent tile across the front.
What if I wish to place the shelf in position other than where a grout joint exists?
This may be accomplished by cutting the tiles inside the Recess-It unit where you wish to place the shelf. A wet saw is best for this purpose since the thickness of the blade will cut a joint through the tile to receive the floating shelf without causing the tile lines to move up the distance of the shelf material.
Is the shelf really strong enough to support anything?
If you have only just tiled the unit it will feel a bit flexible in the middle and leave you wondering about what it can support. However, once the project has been fully grouted and allowed to reach its full cure (usually 24 hours depending on grout manufacturer) it will be sufficient in strength to hold all standard toiletry items.
The grout also plays a key role in holding the shelf in its final position inside the Recess-It. Be sure you check centering of the shelf during grouting to insure final placement!