Raimondi RLS Tile Leveling Spacers

Raimondi Leveling Spacers have been sold in Europe for quite a few years and finally we’re able to introduce them to you!
If you’re a tile installer, you’re well aware of how difficult it is to properly set flexible, large format, heavy, or low-thickness tiles because, often times, the floor foundation is uneven and/or contains imperfections. To make matters worse, tiles that seemed uniformly leveled while first installing them result in tiles that show differences as the tile adhesive sets, compromising the overall aesthetics of your initial hard work.
With the Raimondi Leveling Spacers, this potential is no longer a threat to your perfect tile project. In addition to ensuring the proper leveling of tiles, this system helps speed the tile setting process
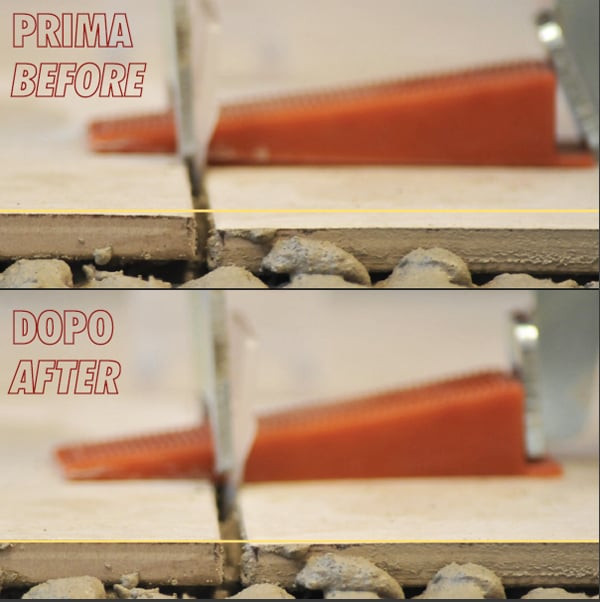
Accurate tile setting requires perfect leveling of the tiles.
Often it is hard to properly set ungauged and thin tiles as well as larger format thicker tiles because of uneven floor foundations.
As a result, tiles that seem perfectly level during the installation, after the thinset or adhesive cures, they often show a variance in height and can com promise the aesthetics.
This can be avoided, thanks to the new Raimondi Leveling Spacers, which will preserve the perfect leveling of the tiles, and will also speed up the installation.
As an end result, you can quickly achieve a smooth level surface using the new R-L-S system.
Minimum required joint: 1/16″. Tile thickness: minimum 1/8″, maximum 1/2″.
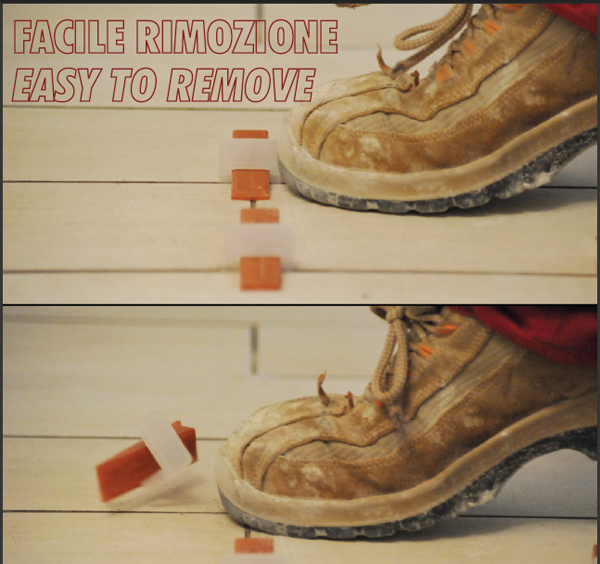
Both the setting and removal of the leveling spacers are quick and easy.
Instructions and Specification

Available Products
Number pcs need by Square foot.
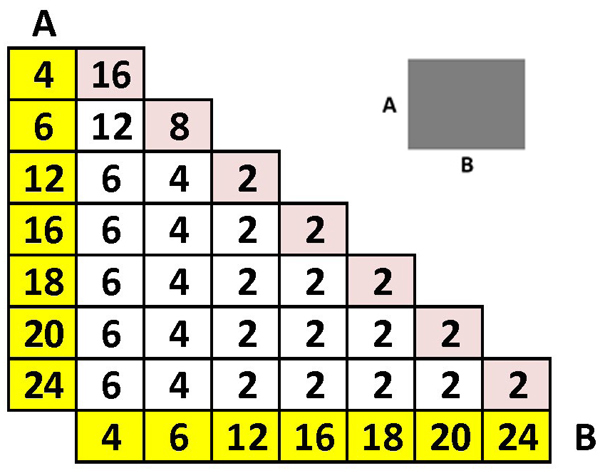
TILE COVERAGE :
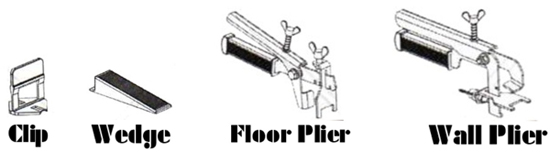
The Raimondi Tile Leveling System’s Standard Kit comes with: 1 RLS floor pliers, 100 spacers and 100 wedges. The wedges can be used over and over again so you’ll only need as many wedges as you can set in 1 day. The spacer clips that are needed will depend largely on how big and thick the individual tiles are for your project as well as your tile layout pattern.
Generally speaking…
In smaller areas such as 6′ x 9′ bathrooms, 100 spacer clips will cover up to:
12″ square tiles = 58 sq.ft.
16″ square tiles = 103 sq.ft.
18″ square tiles = 133.5 sq.ft.
24″ square tiles = 100 sq.ft. (doubling the use of clips for each side)
How many tile leveling clips do I need? When estimating for how many spacer clips needed for larger areas…
Using: (1) leveling clip and (1) tile spacer per side
12″ square tiles = 2 clips per sq. ft.
16″ square tiles = 1.13 clips per sq. ft.
18″ square tiles = 0.89 clips per sq. ft.
Using: (2) leveling clips per side
12″ square tiles = 4 clips per sq. ft.
16″ square tiles = 2.26 clips per sq. ft.
18″ square tiles = 1.78 clips per sq. ft.
24″ square tiles = 1 clip per sq.ft.
Using: (3) leveling clips per side
24″ square tiles = 1.5 clips per sq.ft. [Marble / flexible tiles]
30″ square tiles = 0.96 clips per sq.ft.
36″ square tiles = 0.67 clips per sq. ft.
Using: (4) leveling clips per side
36″ square tiles = 1 clip per sq.ft.
HOW TO USE :
STEP 1
After spreading your tile adhesive, insert leveling spacer underneath the tiles along the 4 sides, use traditional spacers as you normally would to square up the corners. For larger tiles, it may be necessary to “double up”, using 2 leveling spacers for each side.
STEP 2
Set the tile and beat it with a rubber mallet
STEP 3
Use the special traction-adjustable pliers to insert the wedge into the leveling spacers, paying attention not to pass the break point.
STEP 4
Once the tile adhesive has been allowed to set. Remove the leveling spacers with the traction-adjustable pliers, rubber mallet, or kicking them out with your feet.
How to insert the wedge :
1. Insert the wedge in the support slot carefully not to pass the breaking point.
2. To facilitate this operation, the use of the special traction-adjustable-pliers is recommended.
How to remove the support :
Once the adhesive is set, the protruding part of the support, has to be removed by separating it from base. This can be done thanks to the traction-adjustable-pliers, with a rubber mallet or even with feet. Beat parallel to the joint.
FEATURES :
Both installation and removal of the spacers are quick and easy!
Sturdy Tile Wedge holds tiles better than competitors
Works well with both Wall and Floor projects!
Tiles are not pulled from the thinset, they’re pushed into it.
Rather than worrying about voids and coverage, RLS spacers further enhance your thinset adhesion to your tiles!!
TECH SPECS :
Minimum required joint ……….. (1/16″”)
Minimum tile thickness………………… 3-mm (1/8″)
Maximum tile thickness ……………….. 12-mm (1/2″)
Read More:
The post Raimondi RLS Tile Leveling Spacers System first appeared on Flooring Supply Shop Blog.
In reply to Thom Holman.
All leveling system we carry are made for large format tile
here is a link to one of them https://www.flooringsupplyshop.com/product/atr-tile-leveling-system-sample-kit
Do you make a leveling product for large format tile . We are using a 16x32x3/4 tile on walls.
So how many would I need to tile 900 sf of 48” by 8” porcelain? I’m going with 1/8” grout joint but will be installing with 1/3 stagger layout.
We’ve used the leveling clips on past projects and they worked like magic no call backs whatsoever. On this new project we started receiving what im guessing is the new version of the spacer clips wich come folded flat and they can be folded up to insert into the tiles, however for some reason these clips are not that strong enough to hold any pressure on the wedge, some are even snapping off with just using our hands and fingers to push the wedges in place. And our company has bought well over 20 boxes of the 2,000 count red 1/8 inch spacers. The solid clips that came in a solid T shape where way better
In reply to Bob Drake.
you will use the spacers about an inch away from the end of work tiles and the following day you will have the tile ready to continue with same level
In reply to Angie Divietro.
Floors must be level, all leveling system are not to level the floor but to make sure tile not move while thinset are drying.
In reply to Carlos.
Yes you can
How much of an uneven floor slope do these work on?
Can you install leveling clips on a wall with 12 x 24 half inch thick porcelain at a 16th of an inch joint
I have to tile under a frig and stove. Can I do that and let that dry first before continuing with the tile level system? When I restart laying tile, will there be lippage at the edges of the frig and stove?
I am using 5×24 inch wood plank tile on a kitchen floor
In reply to Lou.
You have to feel the tension, test few before until you get used to it
How do you set the floor pliers for the 1/8 leveling clips?The directions just explain how to adjust it. How do I know if it is tight enough but not too tight?
In reply to Les.
Like you said, “couldn’t be a worse tile to try to get level with an un-level floor” and i dont recommending using or wasting your money if you not going to self level the floor first
The whole idea of all those type of lippage system are more to hold the tile in place while the thinset get dry, not to level floor or tile, in some video’s you see how when the squeeze the spacers it level the tile, this is the most you can get from those tile a very little alignment while installing those system
In any case for offset tile you need 3 spacers per interactions (per tile) 6″ x 40″ = 240 : 144 = 1.66 550 : 1.66 = 331 that mean you got 331 tiles 331 x 3 = 993 spacers
We do have a good system that use 1 per interactions and i do recommended it it called ATR Leveling system https://www.flooringsupplyshop.com/tools-109/atr-tile-leveling-system-596/
Good luck
ps Best to contact me via email and not the blog
I’ve got appx 550sq ft to cover over a basement slab that definitely has some leveling issues. I’ll grind down any real obvious high spots but it will still not be perfect. The tile going down is a 6″x40″ plank tile with offset joints. (couldn’t be a worse tile to try to get level with an un-level floor) Anyhow, my question is how many spacers would I need.
What is the minimum trowel needed to accommodate the thickness of the clips under the tile?
In reply to Don.
The ATR Tile leveling spacers will work with any underfloor heating, their plastic made of hard compress plastic to stand heating and not get melt
In reply to csstile.
In general you need 4 clips per intersection of 4 tile or 3 when you use brick pattern (that not include the ATR Leveling) that only use 1 per intersection with standard installation or Brick pattern when it come to 12 x 36 or 12 x 36 you will need to add another clip in the middle that will be also for the ATR
For example on 100 tile of 12 x 12 or up to 18 x 18 you need 360 clips. straps or spacers 4 per tile but if those 100 tile where 12 x 24 then you need another 100 total of 460, with the ATR Leveling you will need either 117 or 217
Hope that help
I forgot to ask what is the formula you use to calculate the number of clips per sq. ft.?
https://blog.flooringsupplyshop.com//how-to-instruction-and-info/atr-tile-leveling-alignment-system-info/atr-leveling-system-comparison-chart/
With the increasing use rectangular tile it would be good to add this size (e.g. 12 x 24, 12 x 36, etc.) to your clips per sq. ft. calculation examples. Additionally, your calculations appear to assume a standard grid pattern. It would be good to include calculations for a square tile offset pattern and for rectangular tile using a subway pattern.
Can you use these spacers on a tile floor with an underfloor heating system? Or is the plastic in danger of melting and compromising the grout?