Satisfaction guaranteed. Call us anytime at 323-731-8453.
Home Improvement General | Flooring Supply Shop Blog

Kitchen Backsplash Ideas

Are you ready to transform your kitchen using our stunning backsplash ideas? From vibrant tiles to sleek mosaic glass, the options are endless when you’re looking to elevate the style and functionality of your kitchen space. Continue reading and jot down your favourite ideas as you explore our variety of design layouts, colours, and materials to find the perfect backsplash to complement your kitchen aesthetic.

countertop-and-lights-in-modern-kitchen-scaled

Countertop and Lights in Modern kitchen

In a modern kitchen, there should be a harmony between countertops and lighting that works together to create a striking focal point. Opting for sleek, durable surfaces like quartz or granite provides both functionality and elegance, while strategically placed lighting—such as under-cabinet LEDs or pendant fixtures—enhances the overall ambiance. This combination not only illuminates kitchen workspaces but also highlights design elements, making it both a practical cooking area and a stylish gathering space for guests.

interior-of-modern-kitchen-with-all-appliances-scaled

Interior of modern kitchen with all appliances

The best way to showcase sleek appliances is by seamlessly integrating them with stylish design elements. Stainless steel refrigerators, dishwashers, and ovens create a finished, polished look, while a statement backsplash adds some personality to an otherwise neutral environment. For example, using mosaic linear glass tiles in classic grey can enhance the space’s contemporary feel. Also, our Dallas border tiles can provide a striking backdrop that elevates the overall aesthetic of your contemporary kitchen, making it functional and visually appealing.

interior-of-a-modern-kitchen-with-a-golden-faucet-scaled

Interior of a modern kitchen with a golden faucet

If your kitchen features a golden faucet, it’s clear that your vision extends beyond mere luxury. The gleaming fixture best serves as a stunning focal point, complementing sleek cabinetry and high-end appliances. Paired with a marble or quartz countertop, the golden hue adds warmth and elegance to the space. If you want to showcase a perfect blend of contemporary design and opulence, pair your beautiful golden kitchen faucet with our signature crackle glass porcelain and glass arabesque tile in blue canal finishing.

stylish-oven-design-scaled

Stylish Onyx Glass Mosaics Oven design

Tiles can beautifully accentuate a stylish oven design, transforming it into the most interesting part of your space. Onyx glass mosaics brick shape tiles in an ocean finish create a sleek, modern backdrop while adding a touch of personality. For a bold look, consider using contrasting colours that complement the oven’s finish, whether it’s stainless steel or matte black. This thoughtful tile choice enhances the overall aesthetic, making the oven not just a cooking appliance but a statement piece in the kitchen.

hotel-gym-compact-bar-area-with-stylish-tiles-scaled

Hotel Gym compact bar area with stylish Tiles

The compact bar area in a hotel gym should feature stylish tiles, like the pele glazed pebbles series blue Hawaiian tile, that enhance its modern design. Sleek, patterned tiles add visual interest while maintaining functionality, which is why this inviting space should offer guests a refreshing spot to unwind post-workout. When you combine aesthetics and practicality, it ensures a seamless transition from fitness to relaxation.

modern-kitchen-design-with-gas-stove-appliance-scaled

Modern Kitchen design with White Ceramic Tile

Backsplash tiles play a crucial role in crafting a modern kitchen design, especially when paired with a gas stove appliance. The sleek Alhambra series white ceramic tile in a bold crema finish can enhance the stove’s contemporary aesthetic, while providing a stylish backdrop that ensures easy maintenance and durability, making cooking a pleasure.

induction-hob-with-white-backsplash-scaled

Induction hob with white minimalist backsplash

An induction hob paired with a white backsplash creates a clean, minimalist look in the kitchen. The sleek, modern design of the hob contrasts beautifully with the bright, reflective tiles, enhancing the overall space. This combination not only adds sophistication but also makes cooking and cleanup effortless.

stylish-gas-stove-scaled

Stylish Textured Kitchen Backsplash Design with Gas Stove

To stylize your gas stove, choose a backsplash that complements its design. Opt for eye-catching tiles, such as colourful mosaics, to create visual interest. A patterned or textured backsplash can add depth, while a glossy finish reflects light, enhancing the overall aesthetic and making the stove a focal point.

cozy-kitchen-zone-scaled

Cozy kitchen zone with Textured minimalist tiles

A well-chosen backsplash can indeed create a cozy kitchen zone. Soft, warm colours or textured tiles invite a sense of warmth and comfort. Pairing earthy tones with rustic or vintage designs fosters a welcoming atmosphere, making the kitchen feel like a homey gathering space.

kitchen-table-top-scaled

Kitchen Table Top

The backsplash and kitchen tabletop work together to enhance the overall design of the space. A harmonious pairing, such as a vibrant backsplash with a complementary wood or stone tabletop, can create a cohesive look. This combination not only adds style but also makes the kitchen functional and inviting for gatherings.

modern-minimalist-kitchen-interior-with-natural-light-scaled

Modern Minimalist Kitchen Interior with Natural light

If you have a modern minimalist kitchen that’s bathed in natural light, consider a sleek, crackle glass porcelain and glass interlock tile in Burano Lace. Its clean lines and subtle texture enhance the airy feel, reflecting light beautifully. Pair it with stainless steel accents for a contemporary touch, or opt for a soft, muted stone for added warmth while maintaining simplicity. Integrating a minimalist grout line further emphasizes the streamlined look, creating a cohesive, serene environment.

grey-kitchen-table-top-with-electric-stove-scaled

Peppermint Green Hexagon Kitchen Backsplash with Electric stove

For a grey kitchen with a sleek electric stove, consider using our peppermint green hexagon glass tile backsplash. This vibrant blend adds a refreshing contrast against the neutral tones, creating visual interest without overwhelming the space. The hexagonal shape enhances modern aesthetics while reflecting light, brightening the area. Its easy-to-clean surface is practical for daily use, making it a stylish and functional choice that beautifully complements your grey countertop.

new-classic-kitchen-in-modern-style-a-new-ceramic-scaled

New Classic kitchen in Modern style a New Ceramic

For a new classic kitchen with modern flair, the kaleidoscope handmade ceramic tile in cream is an excellent backsplash choice. Its 2×8 size offers a timeless look while adding a contemporary twist. The soft cream color enhances the kitchen’s warmth and brightness, creating an inviting atmosphere. Each handmade tile brings unique character, making your space truly one-of-a-kind. This backsplash not only complements various decor styles but also provides a durable, easy-to-clean surface.

open-plan-kitchen-with-living-room-scaled

Open-plan Kitchen with Living Room

An open-plan kitchen should seamlessly integrate with the living room, creating a spacious, inviting atmosphere where a striking backsplash pulls you in with added visual interest. The overall aesthetic is then complemented with natural light that floods the space through expansive windows, illuminating both areas. To finish off, adding stylish furnishings in the living room will provide comfort, making this layout ideal for family gatherings and entertaining guests.

glass-jars-with-ingredients-on-kitchen-counter-scaled

Glass Jars with ingredients on the Kitchen Counter

Glass jars filled with colourful ingredients on the kitchen counter create a charming, organized display. Each jar showcases grains, spices, or dried herbs, adding both functionality and visual appeal. The transparency allows for easy identification and by grouping jars of varying heights to adds interest, you’ll enhance the modern aesthetic of the space. This arrangement not only keeps essentials within reach but also inspires culinary creativity, making cooking a more enjoyable experience.

a-kitchen-sink-with-plant-on-the-window-sill-scaled

A Kitchen sink with plants on the window sill

A kitchen sink adorned with vibrant plants on the window sill boasts a refreshing atmosphere. Herbs like basil and mint thrive in this sunny spot, adding fragrance and flavour to your meals. The greenery also contrasts beautifully with the sink’s sleek design, enhancing the kitchen’s natural aesthetic. This arrangement not only brings life to the space but also encourages a connection to fresh, home-cooked ingredients.

hanging-kitchen-with-white-tiles-wall-and-wood-tab-scaled

Hanging Kitchen with white tiles wall and wood tab

A hanging kitchen featuring a white tile wall paired with a wood tab creates a stunning contrast of textures. The Tahitian pearl mosaic tile adds elegance with its iridescent finish, reflecting light beautifully. This combination enhances the airy feel of the space while providing a chic backdrop for culinary activities. The warm wood tones also add warmth, making the kitchen both stylish and inviting.

modern-kitchen-interior-with-cabinets-and-empty-scaled

Modern kitchen interior with cabinets

A modern kitchen interior with sleek cabinets embodies minimalist elegance. Smooth, handleless designs create a streamlined look, while a neutral color palette enhances the spacious feel. Open shelving can also add to the practicality and display opportunities, showcasing stylish dishware.

kitchen-table-with-various-accessories-in-the-apartment-scaled

Kitchen table with various accessories in the apartment

A kitchen table adorned with various accessories adds personality to your apartment. Consider placing stylish placemats, decorative bowls, and vibrant centerpieces to create a warm environment where mixing textures—like wood and ceramics—enhances the visual interest of your room.

faucet-and-kitchen-faucet-and-countertop-details-scaled

Kitchen faucet and Countertop details

When paired with a sleek countertop, a modern kitchen faucet creates a stunning focal point. The faucet’s polished finish should complement the countertop’s material, whether it’s gleaming quartz or natural stone. With an ergonomic design to ensure ease of use, the countertop’s subtle veining adds further character and functionality to your stylish kitchen.

modern-faucet-in-a-stylish-room-scaled

Modern faucet in a Sleek Tile lines and polished finish

A modern faucet in a stylish room adds a touch of sophistication. Its sleek lines and polished finish should blend seamlessly with contemporary design. This combination of functionality and elegance enhances the overall space, making it both practical and visually appealing.

kitchen-furniture-shelfs-and-accessories-kitchen-scaled

Kitchen furniture shelves and accessories

Kitchen furniture shelves and accessories play a vital role in aesthetics and functionality. Open shelving displays stylish dishware and decorative items, adding character to the space. Additionally, functional accessories, like spice racks and utensil holders, keep essentials organized. A carefully chosen backsplash further complements these elements, enhancing the overall design while providing a cohesive backdrop that ties the kitchen together beautifully.

modern-kitchen-interior-with-hood-with-white-scaled

Modern kitchen interior with hood with white

A modern kitchen interior featuring a sleek white hood creates a bright and airy atmosphere. The minimalist design complements glossy cabinetry and a spacious layout. This elegant focal point also enhances the ventilation of the space, making it ideal for cooking with ease.

kitchen-decoration-scaled

Decorated Kitchen Backsplash

A backsplash serves as a striking kitchen decoration, adding colour and texture to your space. It protects walls from splashes while showcasing personal style. Whether through bold patterns or subtle tones, your chosen backsplash should enhance the overall design, making it a key decorative element.

stylish-kitchen-interior-design-scaled

Stylish kitchen interior design

A stylish kitchen interior design merges aesthetics with functionality, creating a beautiful and practical space. Key elements to consider are sleek cabinetry, modern appliances, and natural light. With unique backsplashes and decorative accessories to add warmth and character, the kitchen will seamlessly become a welcoming hub for your future cooking events.

contemporary-clean-kitchen-with-modern-appliances-scaled

Contemporary clean kitchen with modern appliances

A contemporary clean kitchen will showcase a minimalist aesthetic with sleek cabinetry and streamlined surfaces. Featuring modern appliances, like a smart refrigerator and induction cooktop, it will come together to blend seamlessly into a design that offers advanced functionality.

modern-kitchen-in-dark-tones-with-black-tiled-wall-scaled

Modern kitchen in dark tones with black tiled wall

A modern kitchen in dark tones would look best when it features a striking black tiled wall, which is where our mosaic marble penny series comes into play to enhance the space’s sophistication. These glossy tiles reflect light by creating depth and visual interest. Further, they complement sleek cabinetry and metallic accents, making them a perfect backdrop for your dark kitchen display.

shiny-stainless-steel-faucet-with-chrome-water-tap-scaled

Shiny stainless steel faucet with chrome water tap

A shiny stainless steel faucet paired with a chrome water tap adds a sleek, modern touch to any kitchen. Its reflective surface enhances the overall aesthetic while ensuring durability and easy maintenance, making it a stylish and practical choice for everyday use.

a-kitchen-with-a-stove-top-oven-and-a-sink-scaled

A kitchen with a stove top oven and a sink

A kitchen with a stove top oven and a sink is both functional and inviting. The stove top is perfect for quick meals, while the sink offers convenience for food prep and cleanup. With ample counter space to enhance usability, it’s an ideal setting for cooking and entertaining family and friends.

white-kitchen-with-black-countertop-scaled

White kitchen with Black countertop

A white kitchen with a striking black countertop exudes timeless elegance. The contrast highlights the sleek design, and with our 3D porcelain tile magnolia backsplash adding texture and visual interest, this combination creates a sophisticated backdrop for enhancing the kitchen’s brightness.

How to Remove Grout From Tile Surfaces

One of the first steps in renovating a tiled surface is the removal of old grout. Whether you’re working in the bathroom, kitchen, or elsewhere, deteriorating grout can mar the aesthetic appeal and compromise the integrity of tiled areas.

Understanding how to effectively remove grout is essential for preserving the beauty and longevity of your tiles. There are lots of grout removal tools that can help – from traditional handheld tools like grout saws and scrapers to modern power tools such as oscillating multi-tools and rotary tools.

We’ll explore the arsenal contractors and homeowners need for a successful grout removal project.

Types of Grout Removal Tool

The first step in any successful tiling project is picking the right type of grout removal tool.

Here are some tools to help you get this job done:

Grout Grabber

Oscillating tool
An oscillating tool equipped with a grout removal blade offers precision and control, vibrating at high speeds to swiftly cut through grout without damaging surrounding tiles, making it ideal for intricate areas.

Industrial Tile Builder Worker Installing Floor

Rotary tool
Versatile and powerful, a rotary tool with a grout removal attachment effectively grinds away old grout with ease. Its adjustable speed settings provide flexibility for different tile types and grout depths.

Angle Grinder

Angle grinder
An angle grinder swiftly strips away stubborn grout with its robust spinning disc. It requires caution since it operates at high speeds, but once it can be used safely, it’s highly effective for large-scale grout removal projects.

Manual grout removal tool

Simple yet effective, manual grout removal tools like grout saws and scrapers offer precision for detail work. They’re essential for delicate areas where electric grout removal tools may be too forceful.

Types of Grout That Should Be Removed

There are two types of grout you’re likely to encounter when removing or replacing old tiling.

  • Cement-Based Grout: This is a more traditional type of grout made from cement, sand, and water. Over time, it can become discolored, cracked, or damaged, necessitating a replacement.
  • Epoxy Grout: Epoxy grout is a more durable and stain-resistant alternative to cement-based grout. However, if improperly installed or maintenance is neglected, it will also require removal due to discoloration, chipping, or other issues.

The Best Grout Removal Tool

While there are many places online and in-person where you can buy grout removal tools, the most effective solution ultimately depends on the specific needs of your project and your comfort level with different tools. However, a great option that’s easy for both beginners and experienced contractors to use is the Fein Grout Removal Tool.

Fein Grout Removal

The Fein Grout Removal Tool

The Fein Grout Removal Tool easily fits onto most common grinders and can help remove cracked, damaged, or discolored cement or epoxy grout with ease. Whether you’re a DIY enthusiast or a seasoned contractor, this tool offers a key mix of reliability and efficiency, so you’ll never have to spend hours easing grout away.

This tool provides a smooth and precise grout removal process that can help you finish this often-tedious step and move on to the next phase in your renovation process.

Grout Grabber

Grout Grabber Replacement Carbide Blade

While the Fein Grout Removal Tool can work for as much as 3,000 linear feet, it will need a few replacement blades to ensure it can operate effectively. The Grout Grabber replacement carbide blades can easily accommodate any joint size and will remove grout efficiently for up to 200 linear feet.

Shop Grout Removal Tools at the Flooring Supply Shop

To ensure you can tackle your next tiling project with ease, you’ll need to equip yourself with the right tools for the job.

Whether you’re a seasoned contractor or a DIY enthusiast, you can buy our favorite grout removal tools at the Flooring Supply Shop. We recommend the Fein Grout Removal Tool, which offers unparalleled reliability and efficiency, saving time and effort. With its compatibility with most common grinders, it effortlessly removes cracked, damaged, or discolored grout, providing a precise finish every time.

Don’t let worn-out grout hold back your project. Shop for grout removal tools and accessories at Flooring Supply Shop today.

Frequently Asked Questions

1. What is the best tool to remove hard grout?

We think the best grout removal tool available today is the Fein Grout Removal Tool, which works with any grinder to remove grout with ease.

2. What is the easiest way to remove grout?

It depends on the project! For some stubborn projects, an angle grinder is the best option. However, if you’re working in a tight area or with delicate tiles, you may opt for a manual grout removal tool.

3. Is there a way to soften grout for removal?

Yes, in some situations, you can apply solutions made from chemicals or water and vinegar to soften stubborn grout and make it easier to remove. You may also be able to steam clean it thoroughly, which can help it loosen its grip on tiles.

4. How to remove grout manually?

To remove grout manually, you’ll need to use a sharp manual tool – and you’ll probably need lots of patience!

 5. Where to buy grout removal tools?

We think the best place to buy grout removal tools is Flooring Supply Shop. We offer a wide variety of tools and solutions that can make your project more manageable.

Comprehensive Flooring Supplies Glossary: Flooring Supplies Terms

Understanding the terminology used in the flooring industry is crucial when installing, maintaining, or renovating floors. This comprehensive glossary of flooring supplies terms is designed to help homeowners, contractors, and industry professionals navigate the complex language of flooring materials and tools. Whether selecting the right adhesive, exploring different underlayment options, or learning about the latest flooring trends, this guide will provide clear definitions to make your project smoother and more informed.

GLOSSARY

A

Abrasion Resistance: In flooring, abrasion resistance refers to the material’s ability to withstand wear, friction, and surface damage caused by foot traffic, furniture, and other daily activities.

Adhesion: The bond strength between the flooring material and substrate ensures that the floor stays securely attached and does not lift or peel over time.

African Teak: Also known as Iroko, African Teak is a durable hardwood used in flooring that is valued for its rich, golden brown colour and resistance to wear and moisture.

American Black Walnut: This premium hardwood, known for its deep, rich brown colour and exceptional strength and durability.

B

Bamboo Flooring: One of the most eco-friendly options on the market, bamboo flooring is compressed from bamboo grass, offering a stylish, more natural look to your flooring.

Baseboard: A trim or molding installed along the bottom of a wall, covering the joint between the floor and the wall.

Bevelled edge: A slightly angled or sloped edge on each plank, creating a subtle groove between planks that enhances the appearance of the floor and helps with expansion and contraction.

Bleached/white-washed floors: Wood floors that are treated with a chemical or natural process to lighten the wood’s colour, giving it a pale, washed-out appearance.

Bowed: The condition where a plank or board becomes warped or curved, typically due to changes in humidity or temperature, causing it to rise in the center and create an uneven surface.

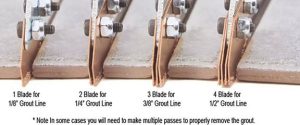
Bridge Tile Saw: A type of tile-cutting tool with a motorized blade that moves along a fixed bridge, allowing for precise, straight cuts to ceramic, porcelain, or stone tiles.

C

Carpet: Soft, textile-based floor material made from woven fibers.

Carpet Pad: A cushioning material placed to provide extra comfort, support, sound insulation, and to extend the lifespan of the carpet by reducing wear and tear.

Carpet Tiles: Square or modular pieces of carpet that can be easily installed, replaced, or rearranged, offering a versatile and customizable flooring solution for both residential and commercial spaces.

Ceramic: Made from clay and other natural materials, ceramic is fired at high temperatures, making it ideal for kitchens, bathrooms, and other high-traffic areas.

Click-Lock Installation: A floating floor method where planks or tiles are interlocked using a tongue-and-groove mechanism, eliminating the need for glue, nails, or staples, and making the installation process quick and easy.

Concrete subfloor: A solid, flat base layer made of poured concrete, typically found in basements or ground-level areas, that serves as the foundation installing various types of flooring.

Copper penny tile: Small, circular tiles made of copper that are used for decorative accents or backsplash installations.

Crowning: A condition where the center or a hardwood plank rises higher than the edges, often caused by excessive moisture or improper installation, leading to an uneven surface.

Cupping: The warping of hardwood planks where the edges rise higher than the center, typical due to moisture imbalances or high humidity.

Curbless shower kits: Pre-fabricated shower systems that are designed without a traditional curb, allowing for a seamless transition between the shower floor and the surrounding bathroom floor, creating a modern and open shower design.

D

Delaminating: A separation or peeling of layers in multi-layered floor material, often caused by moisture, poor adhesive bonding or improper installation.

Distressed Floor: A flooring style intentionally aged or weathered to create a rustic, vintage appearance, often achieved through techniques like scraping, staining, or hand-finishing to give the wood a worn, textured look.

DPC (Damp Proof Course): A barrier installed in the subfloor to prevent moisture from rising through the floor and causing damage or mold growth.

DPM (Damp Proof Membrane): A moisture-resistant layer installed beneath the floor to prevent moisture from seeping up through the subfloor and damaging the floor material.

Durability: A material’s ability to withstand wear, impact, foot traffic, and environmental conditions over time without significant damage.

E

Eased edge: A slightly rounded or softened edge on each plank or tile, which helps prevent sharp corners and creates a smoother, more seamless transition between pieces.

Edge strip: An edge strip in flooring is a finishing or transition strip used to cover the edges of flooring materials, providing a neat, protective border and helping to create a smooth transition between different floor types or levels.

End joint: The connection point where the ends of two adjacent flooring planks or tiles meet, typically designed to fit together securely for a smooth, seamless appearance.

Engineered Hardwood: Flooring made from multiple layers of wood providing the appearance and durability of solid wood while offering better resistance to moisture and temperature fluctuations.

Engineered wood flooring: A multi-layered flooring product consisting of a hardwood veneer layer on top of a plywood core, offering the look of solid wood while being more resistant to moisture.

Epoxy Flooring: A durable, high-performance surface made by applying a resin-based coating over concrete, providing a smooth finish resistant to stains, chemicals, and heavy wear.

Expansion Gap: A small, intentional space left around the perimeter of a floor to allow for natural expansion of the flooring material due to changes in temperature.

Expansion Joint: A gap designed to accommodate the movement of the floor due to thermal expansion, helping prevent cracking or damage.

F

Feature Strip: A decorative inlay used to create visual interest, define boundaries, or add design elements between different flooring materials.

Filler: A material used to fill gaps, cracks, or imperfections in the surface of a floor, ensuring a smooth, even finish before installation or finishing.

Finish: The final protective coating applied to the surface of the floor to enhance its appearance and resistance to moisture and wear.

Flecks: Small, contrasting particles or specks of colour embedded within the material, which add texture and visual interest while helping to mask dirt and wear.

Floating floor: A type of flooring installation where the planks are not attached to the subfloor but instead interlock, allowing the floor to “float” over the surface of an underlayment.

Floating installation: A flooring method where the planks or tiles are connected to each other but not glued, nailed or stapled to the subfloor, allowing the floor to “float” freely over the surface with the help of an underlayment.

Floor joist subfloor: The structural framework of horizontal beams that support the subflooring material, providing a solid foundation for the finishing floor above.

Floor Trusses: Pre-fabricated, triangular-shaped support structures used in flooring systems to provide strength while allowing for easier installation of plumbing and electrical systems within the floor.

Floor wax: A protective coating applied to certain types of flooring to create a glossy finish, enhance durability, and provide a layer of protection against scratches and wear.

G

Glue down installation: A method of flooring installation where adhesive is applied directly to the subfloor, bonded securely to the surface.

Grain: The natural pattern and texture of the wood fibers affecting the overall aesthetic and visual appeal of the floor.

Grade level: The elevation of the floor relative to the ground, with “above grade” being floors located above ground level and “below grade” referring to floors below ground level.

H

Hand-Scraped: A technique where the surface of the wood is manually scraped or textured to create a distressed, rustic appearance with unique variations in texture and character.

Hard wax oil: A protective finish for wood flooring made from a blend of natural oils and waxes, offering a water-resistant surface that enhances the wood’s natural beauty while providing a matte sheen.

Hardwood: Made from solid wood and known for its durability, timeless aesthetic, and ability to be refinished multiple times to maintain its appearance.

Hardwood flooring: A premium flooring material made from solid wood planks, offering a natural, elegant look.

Heartwood: The dense, inner wood of a tree that is typically darker in colour and more durable than the outer layers.

Herringbone: A distinctive flooring pattern where rectangular planks are arranged in a V-shaped, zigzag formation, creating a stylish and dynamic visual effect.

High-Density Fiberboard (HDF): A composite material made from compressed wood fibers used as the core layer in engineered wood.

I

Impact Resistance: A material’s ability to withstand damage from heavy objects or forces, such as dropped items, without denting, cracking, or showing significant wear.

Insulation board: A type of material used beneath the floor surface to provide thermal insulation, soundproofing, and additional cushioning.

Insulation flooring: Flooring systems of materials designed to provide thermal and sound insulation, helping to maintain temperature control and reduce noise transmission within a building.

Insulation panel: A rigid, pre-formed board used beneath the floor surface to improve thermal and sound insulation, as well as enhance energy efficiency.

Island drain kit: drainage system used in curbless or low-threshold shower installations, designed to direct water flow towards a central drain.

J

Janka Hardness Rating: A measurement used to determine the hardness of a wood species by testing the force required to embed a steel ball into wood, helping to assess its suitability for flooring.

Joist: A horizontal structural beam that supports the subfloor and provides stability to the floor system.  

K

Kiln-dried: Wood that has been dried in a controlled environment to reduce its moisture content, preventing warping, shrinking, or mold growth.

Kirb perfect: A specific type of edge treatment designed to create a smooth transition between the floor and a rounded edge.

Knot: A naturally occurring imperfection in wood, where a branch grows, which can be either decorative or a flaw depending on the desired look and quality of the wood.

L

Lacquer: A clear, glossy finish applied to wood surfaces, providing protection and long-lasting shine.

Laminate Flooring: A synthetic, multi-layered flooring material made to resemble hardwood, stone, or other natural materials.

Linoleum: A sustainable flooring made from natural materials, offering durability and a variety of design options.

Load bearing: The ability of a floor structure to support weight without compromising the ability of the floor system.

M

Molding/Trim: A decorative piece of wood, plastic, or metal installed around the edges of a floor to cover expansion gaps and transition between different floor types.

Mineral streak: A natural variation or discolouration in woo often caused by minerals in the soil, adding character or aesthetic appeal.

Moisture Barrier: A protective layer installed underneath the flooring to prevent moisture from seeping up the subfloor and causing damage.

Moisture Content: The amount of water present within a flooring material can affect its stability and is critical for proper installation.

Mortar: A strong, cement-based adhesive used to bond tiles, such as ceramic or stone, providing a durable and stable foundation for the flooring.

Mosaic parquet: A style of parquet flooring made from small, pre-cut wooden pieces arranged in intricate, geometric patterns, offering a high-end look.

N

Nail-down installation: A method where hardwood planks are secured to the subfloor using nails or staples, typically used for solid hardwood floors to create a durable, long-lasting bond.

Nosing: A rounded or beveled edge of a stair tread or the edge of a floor.

O

Open grain: A wood texture where the pores or gaps in the grain are more pronounced.

Oriented Strand Board (OSB): An engineered wood product made from compressed wood strands bonded with resin.

Overlay: A thin layer of material applied over an existing surface to improve the appearance without the need for a complete replacement.

Overlap Reducer: A transition strip used to smoothly transition between two floors of different heights.

P

Padding: A layer of cushioning material that’s placed beneath carpets or other floor coverings to provide comfort and insulation.

Parquet Flooring: A type of wood flooring made from small, geometric pieces in intricate patterns.

Planks: Long, rectangular pieces of wood used for hardwood and installed side by side to cover a large surface area.

Plywood:  An engineered wood product made from layers of thin wood veneer glued together.

Ply/Plies: Individuals layers of wood veneer or other materials that make up a multi-layered product, contributing to its strength and stability.

Polyurethane: A type of synthetic finish applied to wood surfaces, offering a protective coating that enhances the appearance.

Prefinished: Flooring that has been sanded, stained, and boated with a finish in a factory before installation.

Prime engineered wood: The highest grade of engineered wood, characterized by minimal defects, consistent colour, and a smooth surface.

Pin Holes: Small, round indentations in wood or other flooring materials that are caused by natural wood characteristics.

Polyvinyl Acetate (PVA): A type of adhesive used for bonding materials like vinyl, laminate, and hardwood flooring.  

Q

Quadrant (piece of timber): A small, curved piece of timber, often used for decorative edging or time.

Quarter Round: A molding profile with a 90-degree angle and a rounded edge, commonly used along baseboards or where the floor meets the wall.

Quarter sawn: A method of cutting wood where the log is split into quarters and then sawn, resulting in a distinctive grain pattern.

R

Raised grain: A surface texture on wood where the fibers expand due to moisture exposure.

Reclaimed (timber wood): Wood salvaged from old buildings, barns, or other structures.

Rustic grade: A surface texture on wood where the fibers expand due to moisture exposure, creating a rough feel.

Rustic wood: Wood that has a weathered, natural, or aged appearance.

S

Sealer: A protective coating applied to flooring, often before finishing, to prevent moisture penetration and enhance the durability of the surface.

Seam Sealer: A material used to fill and seal the seams between floorboards.

Semi-solid floors: Flooring made from multiple layers of wood, offering stability and a solid wood surface layer, but less dense than fully wood flooring.

Solid engineered (semi solid): A type of engineered flooring with a solid hardwood surface layer and a multi-layer core structure.

Solid wood flooring: Flooring made from a single, solid piece of wood, offering the ability to be sanded and refinished multiple times.

Stair Nosing: The edge trim or molding applied to the front of stair treads, providing a finished look and added safety.

Strip: Narrow, rectangular wood pieces used in flooring.

Strip flooring: A type of wood flooring composed of narrow, tongue-and-groove planks.

Square edge (parquet blocks): A type of parquet flooring where the edges of each block are straight and square, creating a more uniform look.

Sub-Floor: The structural layer beneath the finished floor, providing support and stability for the top flooring layer.

Stain Resistant: Flooring treated to resist staining from spills, dirty, and other other substances.

T

Tapping Block: A tool used during flooring installation to tap planks or tiles into place.

Teak: A durable, moisture-resistant hardwood.

Tack Strip: A narrow strip of wood with sharp tacks used to secure carpet in place.

Transition Strip: A trim piece used to bridge the gap between two different types of flooring or floorheights.

Tile Flooring: Flooring made from ceramic, porcelain, stone, or other materials in square or rectangular shapes.

Tongue and Groove: A method of joining flooring planks, where one edge has a “tongue” that fits into a “groove” in the adjacent piece.

Threshold: A transition piece that sits at the doorway and is used to cover the gap between two rooms.

Texture: The surface quality of flooring, which impacts both appearance and durability.

U

Underlayment Pad: A layer of material placed beneath flooring to provide cushioning.

Unfinished: Flooring that has not been sanded, stained, or finished before installation.

Urethane: A type of synthetic resin used in finishes for wood flooring, offering a durable surface.

UV-cured polyurethane: A finish for wood floors that is cured using ultraviolet light.

Utile: A type of wood used for flooring, particularly in Africa.

V

Vapour barrier: A material used to prevent moisture from rising from the subfloor into the flooring.

V-joint: A joint where the edges of floorboards are beveled to form a “V” shape.

Varnish: A clear, glossy finish used on wood flooring to enhance its natural colour.

Veneer: A thin layer of real wood or other material bonded to a substrate, such as in engineered wood or laminate flooring, providing the appearance of solid wood.

VOCs (Volatile Organic Compounds): Chemicals emitted from certain flooring materials, finishes, or adhesives, which can contribute to air pollution and health issues, often minimized in eco-friendly flooring.

W

Wear Layer: The topmost layer of flooring that provides protection against scratches, stains, and wear over time.

Wax: A finish applied to food flooring that provides a soft, natural sheen and added protection.

Warping: The distortion or bending of flooring due to moisture, humidity, or temperature changes, leading to uneven surfaces or gaps.

Wide-board: Flooring made from planks that are wider than typical boars, offering a more expansive look.

Wirebrush: A technique used to texture the surface of wood flooring, creating a distressed or aged look by brushing away soft wood fibers.

Wood species: The type of wood used for flooring, such as oak, maple, or walnut.

Wood stain: A liquid applied to wood flooring to alter its colour while highlighting the natural grain.

X

X-Acto Knife: A precision cutting tool used in flooring installation for trimming or cutting carpet and vinyl.

Xylem: The tissue in wood that conducts water and nutrients.

Y

Yard Lumber: Wood that is cut to standard sizes and used for framing or structural purposes.

Yarder Wood: Wood harvested using a “yarder”, which is a type of logging equipment, and is often used for structural purposes in flooring or construction.

Z

Zero Clearance Insert: A component used in saws or cutters, providing a tight, secure fit for cutting materials with minimal clearance.

Zoning Laws: Local regulations or restrictions that govern the types of flooring materials or installation methods permitted in certain areas based on safety, environmental, or aesthetic concerns.

How to Clean Laminate Floors: Best Tips for Streak-Free Shine

Laminate flooring is popular due to its durability, sleek appearance, and easy maintenance. However, knowing how to clean laminate floors properly is essential for keeping them in top condition without causing damage. Whether you’re dealing with dust, dirt, or tough stains, using the right techniques and products will ensure your floors stay pristine. This guide will walk you through effective and safe methods to clean laminate floors, ensuring long-lasting beauty and performance.

Sweep and Dry Mop Regularyly

1. Sweep and Dry Mop Regularly

Dirt, dust, and debris can act like sandpaper on laminate floors, gradually causing scratches and wear over time. To prevent this, regular sweeping is crucial. Use a soft-bristled broom or, even better, a dry mop equipped with a microfiber cloth. Microfiber is ideal because it traps dust and small particles without scratching the surface. Regularly sweeping your floors, especially in high-traffic areas, will prevent debris buildup that could otherwise damage your laminate.

For those who prefer a vacuum, ensure you use one designed for hard floors or with a setting that avoids the use of a beater bar, as this can scratch the laminate. This initial cleaning step prepares the floor for deeper cleaning without risking damage from particles being dragged across the surface.

Avoid excess water

2. Avoid Excess Water

One of the most important things to remember when cleaning laminate flooring is that excess water is its enemy. Unlike some types of wood or tile flooring, laminate is not designed to withstand large amounts of water. Too much moisture can seep between the planks and cause them to warp, buckle, or swell over time, leading to costly repairs.

To avoid this, always use a slightly damp mop. After sweeping, lightly dampen the mop with a laminate-friendly solution or water. A damp mop removes surface dirt and stains while ensuring the flooring is not saturated. After mopping, it’s essential to go over the floor with a dry mop or cloth to pick up any excess moisture. This keeps the floor clean while preventing damage from prolonged contact with water.

Use the Right Laminate Floor Cleaner

3. Use the Right Laminate Floor Cleaner

Using the right cleaning products is essential to maintaining the beauty of your laminate flooring. While there are many commercial laminate floor cleaners available, you can also create an effective, budget-friendly solution at home. A mixture of white vinegar and water in equal parts is a great option. Vinegar is a natural cleaner that effectively cuts through grime and kills bacteria without leaving behind any streaks or residue.

If you prefer store-bought options, look for a cleaner specifically designed for laminate flooring. Avoid using products that contain bleach, ammonia, or harsh chemicals, as they can strip the protective coating on your laminate. When using a cleaner, spray it onto the mop or cloth rather than directly onto the floor to control the amount of moisture.

Tackle Stubborn Stains with Rubbing Alcohol

4. Tackle Stubborn Stains with Rubbing Alcohol

For more difficult stains from laminate floors, such as paint, ink, or marker, rubbing alcohol is your best bet. It evaporates quickly, reducing the risk of moisture damage to the laminate. Simply apply a small amount of rubbing alcohol to a soft cloth and gently rub the stained area.

Be careful not to scrub too aggressively, as this could scratch the surface. A gentle rubbing motion should be sufficient to lift the stain. Once the stain is gone, wipe the area with a slightly damp cloth to remove any residue. This method works well for isolated spots and avoids the need for heavier, chemical-based cleaners.

Use Dish Soap for Grease and Oil Stains

5. Use Dish Soap for Grease and Oil Stains

Grease and oil can sometimes end up on your floors, especially in areas like the kitchen. Dish soap, known for cutting through grease, can effectively solve these types of stains. Add a few drops of dish soap to warm water and dip a clean cloth or slightly damp mop into the solution. Gently clean the affected area until the grease or oil is removed.

Prevent scratches

6. Prevent Scratches

Preventing scratches on your laminate wood floors is key to their longevity. Avoid using steel wool or other abrasive materials, as they can scratch the surface. Instead, opt for a microfiber cloth or soft mop head for gentle cleaning. Place rugs in high-traffic areas and attach furniture pads to the legs of chairs and tables to further protect your floors.

Removing Scuffs and Heel Marks

7. Removing Scuffs and Heel Marks

Scuffs and marks left by shoes can be a nuisance. A microfiber cloth and a little elbow grease can usually remove these, but for more persistent marks, try using a pencil eraser or a small amount of rubbing alcohol. Gently rub the mark until it lifts away.

Avoid Harsh Chemicals

8. Avoid Harsh Chemicals

Avoid using harsh chemicals like bleach or ammonia when cleaning laminate floors, as they can damage the protective layer and dull the surface over time. Although strong cleaners may seem effective for tough stains, they pose a risk to your floor’s longevity. Instead, opt for gentler solutions such as white vinegar mixed with water or a laminate floor cleaner specifically designed for this type of flooring. These options are safer for both the laminate and the environment, ensuring that your floors remain clean without causing long-term damage. Always prioritize mild, non-abrasive cleaners for the best results.

Maintain your Mop

9. Maintain Your Mop

A clean mop head is essential for effective cleaning. If your mop head is dirty or overly wet, it can leave streaks on your floor. After each cleaning session, rinse and dry your mop head thoroughly, and replace it regularly to ensure it continues to clean effectively.

Handling Pet Messes

10. Handling Pet Messes

Pets, from accidents to muddy paws, can sometimes leave a mess on your floors. A quick solution of dish soap and water can help clean up any messes without harming your laminate. Afterward, use a dry cloth to avoid any lingering moisture.

Bonus Tips

Avoid Scratches from Furniture

Furniture legs can cause damage if they’re not protected. To avoid scratching your laminate, place protective pads on the bottom of furniture legs. This is especially important for chairs and tables that get moved frequently.

Also, avoid overly damp mops to keep your laminate floors shining, as they can leave streaks. Always finish by wiping the floor with a dry mop or a clean microfiber cloth to ensure it’s completely dry.

Can you put Vinyl flooring over tile?

What is vinyl tile flooring?

Vinyl tile flooring is a type of resilient flooring made from synthetic materials designed to mimic the appearance of natural materials like stone or wood. It comes in individual tiles or planks and is known for its durability, ease of maintenance, and water resistance. Vinyl tile flooring is also often chosen for its affordability, making it a super common material used for both residential and commercial applications.

Can you put vinyl flooring over tile?

Putting vinyl flooring over tile is a method that’s quickly becoming more popular among home and business owners. This is because it’s cheaper, transforming, and possesses minimal disruption. Simply clean, dry, and level the existing tile surface and it’s ready for vinyl flooring installation.

Types of vinyl flooring

Vinyl flooring comes in various styles, including patterns that mimic natural materials like wood and stone, with options such as luxury vinyl tile flooring for a high-end finish. For enhanced performance, you might consider waterproof vinyl tile flooring, which is ideal for moisture-prone areas like kitchens and bathrooms. Additionally, adhesive floor vinyl tiles can provide a secure bond, ensuring durability and longevity. All of these options provide a wide range of design possibilities so that you can explore your aesthetic preferences.

Benefits of covering floor tiles

Covering floor tiles with new flooring offers several benefits. Vinyl floor tiles, for instance, can provide an updated look and improved functionality without the need for extensive demolition.

Moreover, opting for vinyl tile flooring patterns allows you to enhance your space using a variety of designs. With adhesive floor vinyl tiles simplifying the installation process and luxury vinyl tile flooring offering a high-end appearance, your space will feel refreshed regardless of what you choose. Additionally, waterproof vinyl tile flooring is particularly advantageous in moisture-prone areas, so this will add long-term protection as a top-feature.

Fitting Vinyl Tiles on Floor Tiles

How to perfectly fit vinyl floor tiles to fit the room

Fitting vinyl floor tiles perfectly requires precision and careful preparation to ensure a seamless and durable installation.

Follow these steps to achieve a flawless result:

  1. Prepare the surface: Clean the floor thoroughly, removing any debris. Ensure it’s also dry.
  2. Measure and plan: Measure the room to determine how many vinyl floor tiles you need. This will allow you to better plan the layout to ensure symmetry.
  3. Cut the tiles: Using a utility knife or tile cutter, carefully cut the vinyl floor tiles to fit your dimensions. Make sure the cuts are straight for that snug fit.
  4. Apply adhesive: Apply adhesive evenly onto the floor surface.
  5. Lay the tiles: Begin laying the tiles according to your planned layout. Press each tile firmly in place.
  6. Seal the edges: After all tiles are in place, seal the edges with a waterproof sealant to prevent water infiltration.

Cleaning Vinyl Floor Tiles

Maintenance tips after laying vinyl floor tiles over a tile

After laying vinyl floor tiles over existing tile you will use your new flooring as expected. However, we recommend that you clean your floor regularly, avoid harsh chemicals, use floor mats or rugs to minimize wear and tear, and address spills promptly. All of the above suggestions will ensure the longevity of your new floor.

Frequently Asked Questions

1. How to clean vinyl floors?

To clean vinyl floors, use a soft broom or vacuum followed by a damp mop with a mild detergent. We also recommend that you avoid using any harsh chemicals or the use of excessive water when cleaning vinyl flooring.

2. How to install vinyl plank flooring?

To install vinyl plank flooring, prepare the subfloor, lay out and fit the planks in your desired pattern, and secure them in place—usually this is done via click-lock or adhesive method.

3. Can you lay vinyl flooring over tile?

Yes, you can lay vinyl flooring over tile by ensuring the tile surface is clean, dry, and level to provide a stable base for the new vinyl.

4. How to cut vinyl floor tiles?

To cut vinyl floor tiles, measure and mark the designed cut line, then use a utility knife or a vinyl tile cutter to score the tile along the line.

5. How to polish vinyl floor tiles?

To polish vinyl floor tiles, first clean the floor thoroughly, then apply a vinyl floor polish using a clean mop. Allow it to dry for that glossy finish.

6. Does vinyl flooring scratch easily?

Vinyl flooring is generally resistant to scratches, but it can still be scratched by sharp and/or heavy objects. Be sure to use protective pads under your furniture and avoid dragging heavy items across your floors.

7. Where to buy vinyl flooring tiles online?

You can buy vinyl flooring tiles online at Flooring Supply Shop, which offers a diverse selection of styles and prices to suit various applications and aesthetics.

Home Improvement General | Flooring Supply Shop Blog