 |
Schluter Ditra
A Tile floor that won't Crack |
Hassle-Free BeadBoard Wainscot
Ceramic and stone tiles are durable, easy to maintain, and hygienic, representing
the ideal surface coverings.
However, today's lightweight construction
methods can make the
installation of hard surface coverings
particularly challenging.
In order to
protect the integrity of the tile assembly,
an underlayment that performs multiple
functions is required.
|
Function
Ceramic and stone tiles are durable, easy to maintain, and hygienic, representing the ideal surface coverings. However, today's lightweight construction methods can make the installation of hard surface coverings particularly challenging. In order to protect the integrity of the tile assembly, an underlayment that performs multiple functions is required.
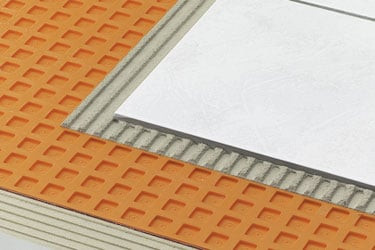
Schluter-DITRA is a polyethylene membrane with a grid structure of square cavities, each cut back in a dovetail configuration, and an anchoring fleece laminated to its underside. Schluter-DITRA is bonded to the substrate using thin-set mortar. The anchoring fleece on the underside of Schluter-DITRA is fully engaged in the mortar to provide a mechanical bond to the substrate. Tile is installed over Schluter-DITRA using the thin-bed method in such a way that the mortar becomes mechanically anchored in the square, cutback cavities of the Schluter-DITRA matting.
Designed specifically for ceramic tile and dimension stone installations, Schluter-DITRA serves as an uncoupling layer, waterproofing membrane, and vapor management layer that accommodates moisture from beneath the tile covering. Further, DITRA performs all these functions while still providing adequate support/load distribution for the tile covering.
a) Uncoupling
Tile has been successfully installed for thousands of years by incorporating an uncoupling layer, or forgiving shear interface, within the tile assembly. Schluter-DITRA provides uncoupling through its open rib structure, which allows for in-plane movement that effectively neutralizes the differential movement stresses between the substrate and the tile, thus eliminating the major cause of cracking and delaminating of the tiled surface.
b) Waterproofing
Schluter-DITRA provides reliable waterproofing in interior and exterior applications. Its polyethylene composition protects the substrate from moisture penetration, which is particularly important in today's building environment where most substrates are moisture sensitive.
c) Vapor management
The distinguishing feature of Schluter-DITRA is the existence of free space created by the configured channels on the underside of the matting. The free space provides a route for excess moisture and vapor to escape from the substrate that could otherwise cause damage to the tile layer above. Thus, DITRA effectively manages moisture beneath the tile covering.
d) Support/load distribution
When placed on a solid foundation, columns or pillars can support tremendous loads. The same physical principle applies to Schluter-DITRA installations. Columnlike mortar structures are formed in the cutback cavities of the matting. Loads are transferred from the tile covering through these column-like mortar structures to the substrate. Since DITRA is virtually incompressible within the tile assembly, the advantages of uncoupling are achieved without sacrificing point load distribution capabilities. The ability of DITRA installations to support and distribute heavy loads while preserving the integrity of the tiled surface has been verified through extensive laboratory and field testing, including applications exposed to vehicular traffic.
|
Installation |
- The substrate must be clean, even, and load bearing. Any leveling must be done prior to placing the tray. If necessary, cut the KERDI-SHOWER-ST tray to size prior to application. The tray should be cut by equal amounts on all four sides to ensure a consistent height of the first course of tile. After locating the correct position (use KERDI-SHOWER-ST as a template), cut a hole in the substrate for the drain.
- Apply unmodified thin-set mortar to the substrate using a 1/4" x 3/8" (6 mm x 10 mm) square- or U-notched trowel. Place the KERDI-SHOWER-ST, making certain to solidly embed the tray in the mortar. Check the underside of the tray to ensure that full coverage is achieved.
- If necessary, cut the KERDI-SHOWER-SC to length with a handsaw. Apply unmodified thin-set mortar to the floor and to the edge of the shower tray using a 1/4" x 3/8" (6 mm x 10 mm) square- or U-notched trowel, and press the curb firmly into place.
- If there is access to the plumbing from below and the waste line can be connected after installing Schluter-KERDI-DRAIN, apply unmodified thin-set mortar to completely fill the step in the shower tray using a 1/4" x 3/16" (6 mm x 5 mm) V-notched trowel. Press Schluter-KERDI-DRAIN firmly into the mortar, ensuring full support of the bonding flange. When job conditions require the setting of Schluter-KERDI-DRAIN by the plumber prior to the installation of the Schluter-KERDI-SHOWER-ST tray (or when there is no access to the plumbing from below), install the KERDI-DRAIN to the appropriate height using the detachable center section of the tray or the foam spacers included with the drain. Before installing the Schluter-KERDI-SHOWER-ST tray, apply thin-set mortar to the substrate and to the top and bottom of the detached center section. Slide the center section into place below the drain to ensure solid and uniform support of the bonding flange.
Note: Schluter-Systems recommends installing the KERDI-SHOWER-ST tray prior to setting KERDI-DRAIN whenever possible. This method affords the installer greater control over the final position of the drain and makes it easier to obtain full support under the bonding flange.
- Apply a bond coat of unmodified thin-set mortar to the tray and bonding flange using a 1/4" x 3/16" V-notched trowel. Embed Schluter-KERDI in the thin-set mortar and work the membrane onto the entire surface to ensure full coverage and remove air pockets. The KERDI is carried to the step in the fleece-laminated bonding flange (template provided). Be sure the connection between the KERDI and KERDI-DRAIN is secure.
Note: A sheet of cardboard can be placed on the floor to protect the KERDI during subsequent steps.
- Construct floor/wall, floor/curb, and wall/wall connections using Schluter-KERDI-BAND or cut sections of KERDI. Seams are easily constructed by overlapping the edges of KERDI or KERDI-BAND by 2" (50 mm) using an unmodified thin-set mortar.
- Seal the shower curb/wall junction using Schluter-KERDI-KERECK or Schluter-KERDI-KERECK-F inside and outside corners and unmodified thin-set mortar.
- Apply a bond coat of thin-set mortar to the shower walls and curb using a 1/4" x 3/16" V-notched trowel. Embed the KERDI in the thin-set mortar and work the membrane onto the entire surface to ensure full coverage and remove air pockets. The KERDI is carried to the height of the shower head (at minimum).
Note: The thin-set mortar used for bonding Schluter-KERDI to the wallsand curb must be appropriate for the substrate and must penetrate and engage the KERDI fleece. For most substrates (e.g., drywall or CBU), an unmodified thin-set mortar is used. Seams in the membrane are constructed by overlapping the edges of KERDI or KERDI-BAND by 2" (50 mm) using an unmodified thin-set mortar.
Note: Any protrusions through the KERDI membrane (e.g., mixing valve, shower head, etc.) must be treated with Schluter-KERDI-BAND and Schluter-KERDI-FIX, or equivalent sealant, to ensure a watertight seal.
- Once the entire membrane, including seams, corners, curbs, and connection to drain, have been completely bonded and, therefore, waterproofed, the assembly is ready to be tiled.
Note: Prior to setting tile, if the assembly is to be water tested, wait 24 hours to allow for final set of the mortar before testing to ensure waterproof performance of the assembly at seams and connections.
- The grate assembly, which is comprised of a square grate, the height adjustment ring, and the lateral adjustment ring, is set with unmodified thin-set mortar. The height of the grate is adjusted via the height adjustment collar and aligned flush with the top of the tile covering. Since the diameter of the height adjustment collar is smaller than the opening of the bonding flange, the grate can be positioned to match the joint pattern of the tile covering.
- For tile installations using the thin-bed method, apply unmodified thin-set mortar directly to the exposed Schluter-KERDI surface and install the tiles, ensuring full coverage. For acid-resistant coverings, use an epoxy adhesive to set and grout the tile.
|
Material |
Schluter-DITRA is manufactured using high-density polyethylene (HDPE), which does not rot and is highly resistant to solutions containing salts, acids, and alkalis, as well as many organic solvents, alcohols, and oils. Its resistance to specific stresses can be provided if concentration, temperature, and exposure time are known. Schluter-DITRA is waterproof and resists the transmission of vapor. The material is inert, non-toxic, and physiologically safe. Schluter-DITRA also meets the American National Standard for Load Bearing, Bonded, Waterproof Membranes for Thin-Set Ceramic Tile and Dimension Stone Installations (ANSI A118.10) and is listed by cUPC.
|
Maintenance
|
For complete installation guidelines and warranty criteria for Schluter-DITRA over the following substrates, please contact Schluter Systems for a copy of the Schluter-DITRA Installation Handbook (USA: 800-472-4588; Canada: 800-667-8746), or our download.
All substrates must be clean, even, and load bearing. Bond-inhibiting surfaces must be removed prior to the application of Schluter-DITRA.
Note:
Type, thickness, and format of the tile or stone surface covering must be suitable for the intended application. Minimum tile format is 2" x 2" (5 cm x 5 cm).
|
Products |
Uncoupling and waterproofing membrane
Item No. |
Dimensions |
DITRA 5M |
3' 3" x 16' 5" = 542 - 1 m x 5 m = 52 |
DITRA 150 |
3' 3" x 45' 9" = 1502 - 1 m x 14 m = 142 |
DITRA 30 |
3' 3" x 98' 5" = 3232 - 1 m x 30 m = 302 |
Waterproofing strip used to seal butt joints and floor/wall connections
Item No. |
Thickness |
Width |
Length |
KEBA 100/125/5M |
4 mil |
5" - 12.5 cm |
16' 5" - 5 m |
KEBA 100/185/5M |
4 mil |
7-1/4" - 18.5 cm |
16' 5" - 5 m |
KEBA 100/250/5M |
4 mil |
10" - 25 cm |
16' 5" - 5 m |
KEBA 100/125 |
4 mil |
5" - 12.5 cm |
98' 5" - 30 m |
KEBA 100/185 |
4 mil |
7-1/4" - 18.5 cm |
98' 5" - 30 m |
KEBA 100/250 |
4 mil |
10" - 25 cm |
98' 5" - 30 m |
Waterproofing strip for sealing movement joints
Item No. |
Thickness |
Width |
Length |
FLEX 125/5M |
12 mil |
5" - 12.5 cm |
16' 5" - 5 m |
FLEX 250/5M |
12 mil |
7-1/4" - 18.5 cm |
16' 5" - 5 m |
FLEX 125/30 |
12 mil |
10" - 25 cm |
16' 5" - 5 m |
FLEX 250/30 |
12 mil |
5" - 12.5 cm |
98' 5" - 30 m |
Pre-formed corners for waterproofing inside and outside corners
| Schluter-KERDI-KERECK-F (Pre-formed corners) |
Item No. |
Thickness |
Packaging |
KERECK / FI 2 |
4 mil |
2 Inside corners |
KERECK / FI 10 |
4 mil |
10 Inside corners |
KERECK / FA 2 |
4 mil |
2 Outside corners |
KERECK / FA 10 |
4 mil |
10 Outside corners |
Pipe collar to seal around pipes or other similar elements that
penetrate the waterproofing layer
| Schluter-KERDI-KM (Pipe collar) |
Item No. |
Dimensions |
Thickness |
Packaging |
KM 5117/22 |
7" x 7" - 17 cm x 17 cm |
4 mil |
5 units |
A single-component sealing and bonding compound with a
silane modified polymer base
Item No. |
Cartridge volume |
KERDIFIX / ...* |
9.81 OZ. (290 ml) |
|
Shower Systems FAQ |
Q. Why should I use Schluter-DITRA in my tile installation?
A. Ceramic and stone tiles are durable, easy to maintain, and hygienic, representing the ideal surface coverings. However, today’s lightweight construction methods can make the installation of hard surface coverings particularly challenging. In order to protect the integrity of the tile assembly, an underlayment that performs multiple functions is required. Schluter-DITRA is specifically designed to allow the installation of ceramic and stone tile over any even and load-bearing substrate. The integration of DITRA’s uncoupling, waterproofing, load-distribution, and vapor management functions makes consistent results viable.
Tile has been successfully installed for thousands of years by incorporating an uncoupling layer, or forgiving shear interface, within the tile assembly. Schluter-DITRA provides uncoupling through its open rib structure, which allows for in-plane movement that effectively neutralizes the differential movement stresses between the substrate and the tile, thus eliminating the major cause of cracking and delaminating of the tiled surface.
Schluter-DITRA provides reliable waterproofing in interior and exterior applications. Its polyethylene composition protects the substrate from moisture penetration, which is particularly important in today’s building environment where most substrates are moisture sensitive.
The distinguishing feature of Schluter-DITRA is the existence of free space created by the configured channels on the underside of the matting. The free space provides an escape route for excess moisture and vapor that could otherwise cause damage to the tile layer above. Thus, DITRA effectively manages moisture beneath the tile covering.
When placed on a solid foundation, columns or pillars can support tremendous loads. The same physical principle applies to Schluter-DITRA installations. Column-like mortar structures are formed in the cutback cavities of the matting. Loads are transferred from the tile covering through these column-like mortar structures to the substrate. Since DITRA is virtually incompressible within the tile assembly, the advantages of uncoupling are achieved without sacrificing point load distribution capabilities. The ability of DITRA installations to support and distribute heavy loads while preserving the integrity of the tiled surface has been verified through extensive laboratory and field testing, including applications exposed to vehicular traffic.
Q. I’m planning to install my tile using Schluter-DITRA. Where do I begin?
A. The first thing to do is plan out the installation according to the Schluter-DITRA Installation Handbook. The Handbook is available on our website for download or you can call Customer Support to request a print copy. The comprehensive Handbook features all the warranted Schluter-DITRA details for ceramic and stone tile installation in both interior and exterior applications over various substrates, such as plywood, OSB, concrete, poured gypsum underlayments, and heated floors. Each application features a detailed illustration and provides direction on substrate preparation, appropriate setting and grouting materials, movement joints, etc.
Q. What size trowel should I use to install Schluter-DITRA?
A. A 1/4" x 3/16" or 5/16" x 5/16" V-notched trowel is recommended. Mix your thin-set mortar to a fairly fluid consistency (but still able to hold a notch) and solidly embed the Schluter-DITRA into the fresh mortar with a float or screed trowel. It is good practice to periodically lift a corner of the DITRA after embedding it in the thin-set mortar to check the fleece for full coverage.
Q. What type of thin-set mortar should I use when installing Schluter-DITRA?
A. The type of thin-set mortar used to install Schluter-DITRA depends on the substrate material. For example, to set DITRA over plywood or OSB, a modified thin-set mortar meeting the requirements of ANSI A118.11 is used. To set DITRA over concrete or gypsum, Schluter-Systems recommends an unmodified thin-set mortar meeting the requirements of ANSI A118.1. Please consult the Schluter-DITRA Installation Handbook before beginning your tile project to confirm the proper materials selection.
Q. What type of thin-set mortar should I use when setting tile over Schluter-DITRA?
A. Schluter-Systems requires the use of an unmodified thin-set mortar meeting the requirements of ANSI A118.1 to install ceramic (including porcelain) and stone tile over Schluter-DITRA*.
We don’t recommend the use of modified thin-set mortars to set tile over DITRA because these mortars must air dry to cure properly. When sandwiched between two impervious layers such as DITRA and porcelain tile, drying takes place very slowly through the open grout joints. [According to the TCA Handbook for Ceramic Tile Installation, this drying period can fluctuate from 14 days to over 60 days, depending on the geographic location, the climatic conditions, and whether the installation is interior or exterior]. Therefore, extended cure times would be required before grouting if using modified thin-set mortars between DITRA and ceramic tile, including porcelain tile. If extended cure times were not observed, the results could be unpredictable. This is even more important to consider in exterior applications that are exposed to rain, as there is the additional concern of latex leaching.
*Exception: Certain moisture-sensitive stones, e.g., green marble, or resin-backed tiles may require special setting materials. Please consult your stone supplier and Schluter-Systems for more information. For an acid-resistant covering, use an epoxy adhesive to set and grout the tile.
Q. How do I know if the thin-set mortar is modified or unmodified?
A. In general, unmodified thin-set mortar is a blend of Portland cement, sand, and water retention agents that is mixed with water by the user. The appropriate product standard for unmodified thin-set mortars is ANSI A118.1. Look for this standard on the packaging (e.g., product meets ANSI A118.1 when mixed with water). Unmodified thin-set mortar may also be referred to as dry-set mortar by the manufacturer.
Modified thin-set mortars are similar to unmodified thin-set mortars, but include additional polymers such as latex. The additional polymers are introduced in either liquid or powder form. In the first case, the user mixes an unmodified or dry-set mortar powder with a liquid polymer additive instead of water. In the second case, the polymers are added by the manufacturer to the dry blend in powder form. The user then mixes the powder with water. The appropriate product standards for modified thin-set mortars include ANSI A118.4 and ANSI A118.11.
Q. Can I use a premixed thin-set mortar to install Schluter-DITRA and tile?
A. No. Schluter-Systems does not recommend the use of premixed thin-set mortars (mastics/adhesives) in any Schluter-DITRA installation.
Q. Do I need to provide movement joints when I use Schluter-DITRA in my tile installation?
A. Yes. Schluter-DITRA does not eliminate the need for movement joints. Movement joints are essential in any tile installation to prevent the development of stress in the tile layer due to changes in temperature, moisture, and loading. These include perimeter joints at field edges and restraining surfaces, and surface joints within the tile field at regular intervals. Please refer to the Schluter-DITRA Installation Handbook for further discussion and guidelines for movement joint placement.
Note: Schluter-Systems’ prefabricated movement joint profiles protect tile edges and prevent sound bridges and surface water penetration, resulting in a permanent, maintenance-free installation. The family of Schluter-DILEX prefabricated movement profiles includes a variety of shapes, sizes, and materials to suit different applications.
Q. Can I install glass tile over Schluter-DITRA?
A. Schluter-Systems does not recommend the use of glass tile over Schluter-DITRA.
Q. I tried to snap chalk lines on Schluter-DITRA before setting my tile, but the chalk rubs off the plastic easily while I am working. What can I do?
A. One option is to apply hair spray over the chalk lines. You don’t have to worry about the hair spray acting as a bond breaker because the thin-set mortar applied over Schluter-DITRA is locked into the cut-back cavities on top of the membrane. Another option is to use an ink line instead of a chalk line.
Q. I need to remove and reinstall a tile on Schluter-DITRA. How can I do this safely?
A. If you are in the process of setting the tile and the thin-set mortar is still fresh, simply run your margin trowel under the surface of the tile to break the suction created by the thin-set mortar and remove the tile. If you have already set the tile and the thin-set mortar has cured, you will need to take a different approach. Cut through the tile assembly down to the substrate around the tile to be replaced. Remove tile, DITRA, and thin-set mortar from the substrate, taking care not to disrupt adjacent tile work. Reinstall a new section of DITRA and tile using the appropriate setting materials per the Schluter-DITRA Installation Handbook.
|
Description: |
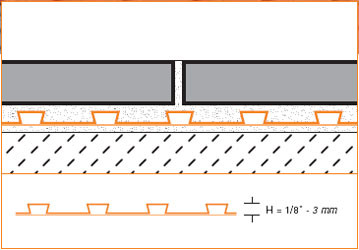
1/8 inch (3 mm) thick, orange, high-density polyethylene membrane with a grid structure of 1/2 inch x 1/2 inch (12 mm x 12 mm) square cavities, each cut back in a dovetail configuration, and a polypropylene anchoring fleece laminated to its underside.
Conforms to definition for uncoupling membranes in the Tile Council of North America Handbook for Ceramic Tile Installation and is listed by cUPC® to meet or exceed the requirements of the “American national standard specifications for load bearing, bonded, waterproof membranes for thin-set ceramic tile and dimension stone installation A118.10.”
|
Easy step-by-step installation
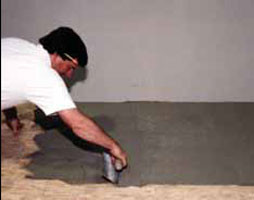 - -  - - 
1. Using a thin-set mortar that is suitable for
the substrate, apply the thin-set mortar
(mixed to a fairly fluid consistency, but still
able to hold a notch) using a 1/4" x 3/16"
(6 mm x 5 mm) or 5/16" x 5/16" (8 mm x
8 mm) V-notched trowel. |
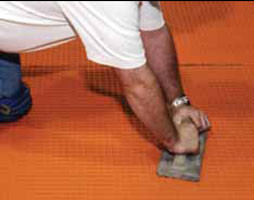
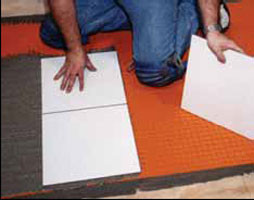
2. Apply Schluter®-DITRA to the floor, fleece side down.
Work DITRA into the mortar, using a float or screed trowel in such a way
that the fleece of the DITRA is solidly embedded in the bonding mortar throughout its entire surface (please observe the open time of the bonding mortar).
After applying DITRA, lift up one corner to check the fleece for full mortar coverage.
For joining sections of DITRA, simply abut end and side sections of adjacent sheets. |
3. Tile can be installed over Schluter®-DITRA immediately; no need to wait for the mortar to cure.
Using a trowel that is appropriate for the size of the tile, apply the bonding mortar (unmodified thin-set mortar) and solidly embed the tiles in the setting material. Periodically remove and check a tile to ensure that full coverage is being attained. |
ESTIMATED THIN-SET COVERAGE
To bond DITRA to the substrate: Use one 50-lb. (22.68 kg) bag of mortar per 150 - 200 ft2 (13.9 - 18.6 m2).
To bond the tile to the DITRA, using a 1/4" x 3/8" (6 mm x 10 mm) square- or U-notched trowel: Use one 50-lb (22.68 kg) bag
of mortar per 40 - 50 ft2 (3.7 - 4.6 m2). |
| |
| |
Back to Schluter System
|
Schluter Kerdi - Schluter Kerdi Drain - Schluter Rema - Schluter ST SC SR - Schluter Ditra - Kerdi Fix
How To Install
|
This page was created by FlooringSupplyShop you may view it for personal use only,
and for flooringsupplyshop.com customers only. DO NOT copy for commercial use. copyright material of www.flooringsupplyshop.com & International Flooring Center, inc. |
|