www.flooringsupplyshop.com Flooring Supply Store


Schluter Shower System Installation

Step by Step Installation Procedure


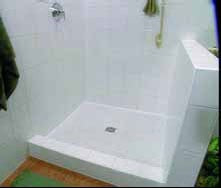
Tiled showers have always represented a considerable challenge to installers.

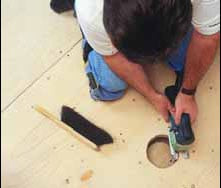
Typically, an installer must place a mortar bed, sloped to the weep holes in the sub-drain, prior to installing the pan liner.
Once the “pre-slope” has cured to the point where it can be walked upon, the pan liner is installed, with its tenuous connections to the clamping ring in the sub-drain, seaming, and carefully fitted corners around the curb area, all of which must be bonded with the appropriate solvent-based bonding agent.
Each of these steps must be completed, and the weep holes protected from being clogged with mortar, before the shower pan is ready to receive the setting bed for the floor tiles.
This conventional methodology requires substantial time and labor.
Since shower pan liners are placed below the mortar setting bed in a conventional assembly, moisture is allowed to saturate the mortar bed.
This can increase the risk of leakage, cause efflorescence, and foster bacteria and fungus growth.

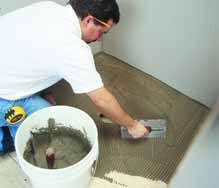
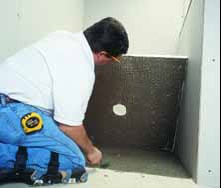
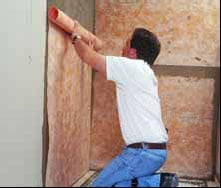
Bonded waterproof membranes, on the other hand, bond directly to the mortar bed and protect it from becoming saturated.
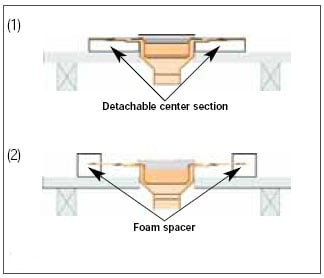
The problem is that conventional two-piece floor drains are designed to connect to shower pan liners below the mortar bed and do not allow a secure, watertight connection to bonded waterproof membranes at the top of the drain assembly.
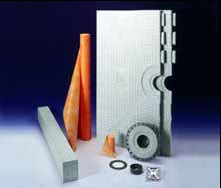
The objective, therefore, is to develop a system in which the individual components collectively form a bonded watertight assembly. The Schluter®-Systems Shower Assembly is an integrated family of products that achieves this objective.

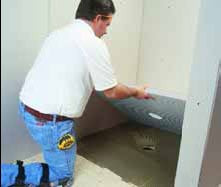
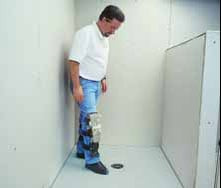
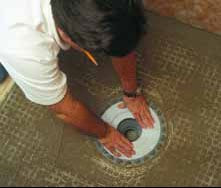
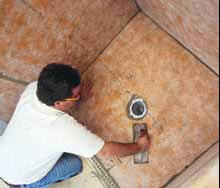
The foundation of the system is the Schluter®-KERDI-DRAIN, which was designed specifically to ensure a simple and secure connection to bonded waterproof membranes, such as the Schluter®-KERDI waterproofing membrane, at the top of the assembly rather than below it, thereby reducing the risk of leakage, efflorescence, and fungus and bacteria growth.

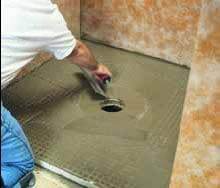
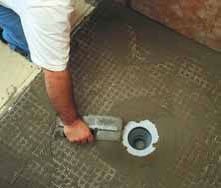
For shower floors constructed with mortar, KERDI-DRAIN eliminates the process of pre-sloping the floor.
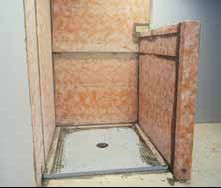
When used in conjunction with KERDI-SHOWER-ST and KERDI-SHOWER-SC, the mortar setting bed is eliminated altogether.
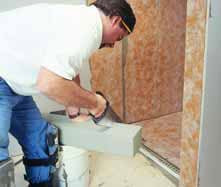
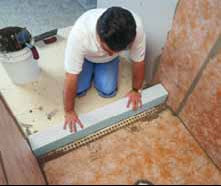
The system is completed with Schluter®-RONDEC and DILEX profiles, which finish and protect outside corners and eliminate caulking.
The Schluter®-Systems Shower Assembly eliminates the risk of failures due to both vapor and water penetration, is maintenance free,and dramatically reduces total installation time.

The integrated Schluter® Shower System ensures success and makes shower installation easier than ever.


1

Schluter Kerdi, Schluter System, Schluter Shower System, Schluter waterproof membrane, by www.flooringsupplyshop.com Los Angeles CA

Schluter® materials required to complete the installation:

A) KERDI-DRAIN (includes KERDI-KERECK prefabricated corners)
B) KERDI (waterproofing membrane)
C) KERDI-BAND (waterproofing strip)
D) KERDI-SHOWER-ST (prefabricated tray)
E) KERDI-SHOWER-SC (prefabricated curb)


2

Schluter Kerdi, Schluter System, Schluter Shower System, Schluter waterproof membrane, by www.flooringsupplyshop.com Los Angeles CA

After locating the correct position for the drain, cut a hole in the substrate using KERDI-SHOWER-ST tray as a template.

3

Schluter Kerdi, Schluter System, Schluter Shower System, Schluter waterproof membrane, by www.flooringsupplyshop.com Los Angeles CA

Apply thin-set mortar to the substrate using a 1/4" x 3/8" square- or U-notched trowel.

Note: The floor must be level. Any leveling must be done prior to placing the tray.

4

Schluter Kerdi, Schluter System, Schluter Shower System, Schluter waterproof membrane, by www.flooringsupplyshop.com Los Angeles CA

Place the KERDI-SHOWER-ST tray in the mortar.

5

Schluter Kerdi, Schluter System, Schluter Shower System, Schluter waterproof membrane, by www.flooringsupplyshop.com Los Angeles CA

Ensure that the tray is solidly embedded in the mortar.

6

Schluter Kerdi, Schluter System, Schluter Shower System, Schluter waterproof membrane, by www.flooringsupplyshop.com Los Angeles CA

Check the underside of the tray to ensure that full coverage is achieved.


Note:

The KERDI-SHOWER-ST tray can be cut to size to fit various applications. Ideally, the tray should be cut by equal amounts on all four sides to ensure
a consistent height of the first course of wall tile. The shower base can also be extended past the perimeter of the shower tray using dry pack mortar.

7

Schluter Kerdi, Schluter System, Schluter Shower System, Schluter waterproof membrane, by www.flooringsupplyshop.com Los Angeles CA

Construct floor/wall connections and seal vertical inside corners using the KERDIBAND waterproofing strip or cut sections of KERDI waterproofing membrane. Apply the thin-set mortar using a 1/4" x 3/16" V-notched trowel.

8

Schluter Kerdi, Schluter System, Schluter Shower System, Schluter waterproof membrane, by www.flooringsupplyshop.com Los Angeles CA

Protect walls from moisture and vapor penetration using KERDI. Seams are constructed by overlapping the edges of KERDI or KERDI-BAND by 2" (50 mm) using unmodified thin-set mortar. Apply the thin-set mortar using a 1/4" x 3/16" V-notched trowel.

9

Schluter Kerdi, Schluter System, Schluter Shower System, Schluter waterproof membrane, by www.flooringsupplyshop.com Los Angeles CA

OPTION: Walls can be waterproofed with KERDI prior to the installation of the tray.
Floor/wall connections are constructed with KERDI-BAND after installing the tray.


Note: The type of bonding mortar used to apply KERDI must be suitable for the substrate. Generally, an unmodified thin-set mortar is used.
Unmodified thin-set mortar must be used to construct all KERDI seams and to apply tile over the KERDI membrane.

10

Schluter Kerdi, Schluter System, Schluter Shower System, Schluter waterproof membrane, by www.flooringsupplyshop.com Los Angeles CA

If there is access to the plumbing from below and the waste line can be connected after installing the KERDI-DRAIN, apply dry-set mortar to the entire shower tray surface using a 1/4" x 3/16" V-notched trowel, making sure to completely fill the step in the shower tray.

11

Schluter Kerdi, Schluter System, Schluter Shower System, Schluter waterproof membrane, by www.flooringsupplyshop.com Los Angeles CASchluter Kerdi, Schluter System, Schluter Shower System, Schluter waterproof membrane, by www.flooringsupplyshop.com Los Angeles CA

A. The KERDI-DRAIN is pressed firmly into the thin-set mortar, ensuring full support of the bonding flange.
B. When KERDI-DRAIN must be set by the plumber prior to the KERDI-SHOWER-ST tray (or when there is no access to the plumbing from below), install the KERDI-DRAIN to the appropriate height using the detachable center section (1) of the tray or the foam spacers (2) included with the drain.
Before installing the KERDI-SHOWER-ST tray, apply thin-set mortar to the substrate and to the top and bottom of the detached center section. Slide the center section into place below the drain to ensure solid and uniform support of the bonding flange.*

12

Schluter Kerdi, Schluter System, Schluter Shower System, Schluter waterproof membrane, by www.flooringsupplyshop.com Los Angeles CA

Apply additional mortar to the top of the fleece-laminated bonding flange.

13

Schluter Kerdi, Schluter System, Schluter Shower System, Schluter waterproof membrane, by www.flooringsupplyshop.com Los Angeles CA

Embed the KERDI waterproofing membrane into the mortar and work the matting onto the entire surface of the tray to ensure proper adhesion and to remove air pockets. Be sure the connection between the KERDI and KERDI-DRAIN is secure and watertight.

14

.Schluter Kerdi, Schluter System, Schluter Shower System, Schluter waterproof membrane, by www.flooringsupplyshop.com Los Angeles CA

If necessary, cut the KERDI-SHOWER-SC curb to length using a handsaw.

15

Schluter Kerdi, Schluter System, Schluter Shower System, Schluter waterproof membrane, by www.flooringsupplyshop.com Los Angeles CA

Apply thin-set mortar to the floor and to the edge of the shower tray using a 1/4" x 3/8" square- or U-notched trowel, and press the curb firmly into place.

16

Schluter Kerdi, Schluter System, Schluter Shower System, Schluter waterproof membrane, by www.flooringsupplyshop.com Los Angeles CA

Seal the shower curb/wall junction using KERDI-KERECK inside and outside corners, and unmodified thin-set mortar.

17

Schluter Kerdi, Schluter System, Schluter Shower System, Schluter waterproof membrane, by www.flooringsupplyshop.com Los Angeles CA

The entire shower assembly is now waterproof and ready for tile setting.
The final result: a fully waterproof shower installation that is both beautiful and maintenance-free.


*Note:

Schluter®-Systems recommends installing the KERDI-SHOWER-ST tray prior to setting KERDI-DRAIN whenever possible.
This allows greater control over the final position of the drain and makes it easier to obtain full support under the bonding flange.
 
Back to Schluter System

Schluter Kerdi - Schluter Kerdi Drain - Schluter Rema - Schluter ST SC SR - Schluter Ditra - Kerdi Fix

How To Install


This page was created by tiledepot you may view it for personal use only,
and for flooringsupplyshop.com customers only. DO NOT copy for commercial use. copyright material of www.flooringsupplyshop.com & International Flooring Center, inc.
.