|
Schluter Kerdi Shower ST-SC-SR
|
|
Function

Schluter-KERDI-SHOWER-ST is a sloped shower tray made of lightweight, expanded polystyrene for constructing tiled shower receptors. It is designed to accept the Schluter-KERDI-DRAIN and Schluter-KERDI waterproofing membrane and is available in 48" x 48" (122 cm x 122 cm), 32" x 60" (81 cm x 152 cm), and 72" x 72" (183cm x 183 cm) sizes with centered drain placement, or 32" x 60" (81 cm x 152 cm) with drain placement 10" (25.4 cm) o.c. from the end of the tray.
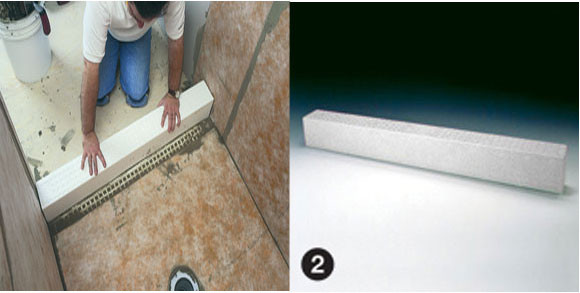
Schluter-KERDI-SHOWER-SC is a lightweight, expanded polystyrene shower curb that can be used with Schluter-KERDI-SHOWER-ST or conventional mortar applications. Curb dimensions are 48" x 6" x 4-1/2" (122 cm x 15 cm x 11.5 cm).
Schluter-KERDI-SHOWER-SR is a lightweight, expanded polystyrene shower ramp specifically designed to facilitate the construction of access ramps for tiled showers.
The Schluter-KERDI-SHOWER-ST tray, KERDI-SHOWER-SC curb, and KERDI-SHOWER-SR ramp are specifically designed to integrate with Schluter-KERDI, a load-bearing, bonded waterproofing membrane, and Schluter-KERDI-DRAIN, a floor drain featuring an integrated bonding flange. When combined with Schluter-RONDEC and DILEX profiles, the result is a completely watertight, easy to maintain shower assembly
|
Installation
|
- The substrate must be clean, even, and load bearing. Any leveling must be done prior to placing the tray. If necessary, cut the KERDI-SHOWER-ST tray to size prior to application. The tray should be cut by equal amounts on all four sides to ensure a consistent height of the first course of tile. After locating the correct position (use KERDI-SHOWER-ST as a template), cut a hole in the substrate for the drain.
- Apply unmodified thin-set mortar to the substrate using a 1/4" x 3/8" (6 mm x 10 mm) square- or U-notched trowel. Place the KERDI-SHOWER-ST, making certain to solidly embed the tray in the mortar. Check the underside of the tray to ensure that full coverage is achieved.
- If necessary, cut the KERDI-SHOWER-SC to length with a handsaw. Apply unmodified thin-set mortar to the floor and to the edge of the shower tray using a 1/4" x 3/8" (6 mm x 10 mm) square- or U-notched trowel, and press the curb firmly into place.
- If there is access to the plumbing from below and the waste line can be connected after installing Schluter-KERDI-DRAIN, apply unmodified thin-set mortar to completely fill the step in the shower tray using a 1/4" x 3/16" (6 mm x 5 mm) V-notched trowel. Press Schluter-KERDI-DRAIN firmly into the mortar, ensuring full support of the bonding flange. When job conditions require the setting of Schluter-KERDI-DRAIN by the plumber prior to the installation of the Schluter-KERDI-SHOWER-ST tray (or when there is no access to the plumbing from below), install the KERDI-DRAIN to the appropriate height using the detachable center section of the tray or the foam spacers included with the drain. Before installing the Schluter-KERDI-SHOWER-ST tray, apply thin-set mortar to the substrate and to the top and bottom of the detached center section. Slide the center section into place below the drain to ensure solid and uniform support of the bonding flange.
Note: Schluter-Systems recommends installing the KERDI-SHOWER-ST tray prior to setting KERDI-DRAIN whenever possible. This method affords the installer greater control over the final position of the drain and makes it easier to obtain full support under the bonding flange.
- Apply a bond coat of unmodified thin-set mortar to the tray and bonding flange using a 1/4" x 3/16" V-notched trowel. Embed Schluter-KERDI in the thin-set mortar and work the membrane onto the entire surface to ensure full coverage and remove air pockets. The KERDI is carried to the step in the fleece-laminated bonding flange (template provided). Be sure the connection between the KERDI and KERDI-DRAIN is secure.
Note: A sheet of cardboard can be placed on the floor to protect the KERDI during subsequent steps.
- Construct floor/wall, floor/curb, and wall/wall connections using Schluter-KERDI-BAND or cut sections of KERDI. Seams are easily constructed by overlapping the edges of KERDI or KERDI-BAND by 2" (50 mm) using an unmodified thin-set mortar.
- Seal the shower curb/wall junction using Schluter-KERDI-KERECK or Schluter-KERDI-KERECK-F inside and outside corners and unmodified thin-set mortar.
- Apply a bond coat of thin-set mortar to the shower walls and curb using a 1/4" x 3/16" V-notched trowel. Embed the KERDI in the thin-set mortar and work the membrane onto the entire surface to ensure full coverage and remove air pockets. The KERDI is carried to the height of the shower head (at minimum).
Note: The thin-set mortar used for bonding Schluter-KERDI to the wallsand curb must be appropriate for the substrate and must penetrate and engage the KERDI fleece. For most substrates (e.g., drywall or CBU), an unmodified thin-set mortar is used. Seams in the membrane are constructed by overlapping the edges of KERDI or KERDI-BAND by 2" (50 mm) using an unmodified thin-set mortar.
Note: Any protrusions through the KERDI membrane (e.g., mixing valve, shower head, etc.) must be treated with Schluter-KERDI-BAND and Schluter-KERDI-FIX, or equivalent sealant, to ensure a watertight seal.
- Once the entire membrane, including seams, corners, curbs, and connection to drain, have been completely bonded and, therefore, waterproofed, the assembly is ready to be tiled.
Note: Prior to setting tile, if the assembly is to be water tested, wait 24 hours to allow for final set of the mortar before testing to ensure waterproof performance of the assembly at seams and connections.
- The grate assembly, which is comprised of a square grate, the height adjustment ring, and the lateral adjustment ring, is set with unmodified thin-set mortar. The height of the grate is adjusted via the height adjustment collar and aligned flush with the top of the tile covering. Since the diameter of the height adjustment collar is smaller than the opening of the bonding flange, the grate can be positioned to match the joint pattern of the tile covering.
- For tile installations using the thin-bed method, apply unmodified thin-set mortar directly to the exposed Schluter-KERDI surface and install the tiles, ensuring full coverage. For acid-resistant coverings, use an epoxy adhesive to set and grout the tile.
|
Material
|
Schluter-KERDI-SHOWER-ST, -SC, and -SR are manufactured using expanded polystyrene (PS 40). Schluter-KERDI-SHOWER-ST, -SC, and -SR require no special disposal and can be recycled. No CFC’s or HCFC’s are present in either the product or in the manufacturing process. Exposure to ultraviolet rays (sunlight) for long periods of time will result in partial degradation (dusting) at the surface.
The polystyrene foam has a density of 2.7
| |