 |
Schluter Kerdi Drain
|
Function
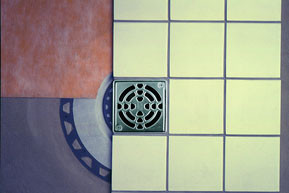
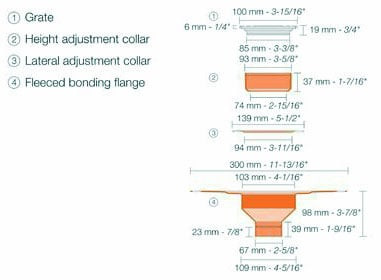
Schluter-KERDI-DRAIN is a floor drain specifically designed to allow connections to Schluter-KERDI or other load-bearing, bonded waterproof membranes, typically in shower applications. Bonded waterproof membranes represent the current state of technology and are increasingly used for ceramic tile and natural stone coverings. Schluter-KERDI is adhered to the drain's large, trapezoid-perforated bonding flange, which is covered with a fleece webbing, to form a waterproof connection at the top of the drain assembly. KERDI-DRAIN features a square, fully adjustable grate to accommodate 1/4" (6 mm) to 1-1/4" (32 mm) tile thicknesses. The grate assembly allows lateral and tilt adjustment as well. KERDI-DRAIN is designed to simply integrate with standard 2" (51 mm) drain pipes, making it suitable for new construction and renovation.
Installation
Choose the Schluter-KERDI-DRAIN casing material (ABS or PVC) based upon existing plumbing materials.
Shower Bases Constructed with Mortar
1. (a) If there is access to the plumbing from below, and the waste line will be connected subsequent to installing Schluter-KERDI-DRAIN, the drain canbe firmly embedded in a ring of loose mortar and leveled before placing the screed.
(b) When job conditions require the setting of the KERDI-DRAIN by the plumber prior to the installation of the mortar bed (or when there is no access to the plumbing from below), connect the drain to the waste line at the desired height. Pack loose mortar under the bonding flange and drain casing, such that the unit is fully supported, before placing the screed. When installing KERDI-DRAIN over wood substrates, the minimum thickness of mortar required at the perimeter of the bonding flange is 1".
Note: Schluter®-Systems recommends installing the KERDI-DRAIN according to step 1. (a) above whenever possible. This method affords the installer greater control over the final position of the drain and makes it easier to obtain full support under the bonding flange.
2. The screed is then placed flush with the top of the trapezoid-perforated bonding flange of the KERDI-DRAIN. Slope the mortar bed using the bonding flange and a perimeter screed as guides.
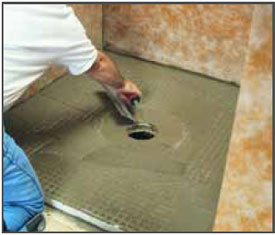
3. As soon as the mortar can be walked upon, apply a bond coat of unmodified thin-set mortar to the screed and bonding flange using a 1/4" x 3/16" V-notched trowel. Embed Schluter-KERDI in the thin-set mortar and work the membrane onto the entire surface to ensure full coverage and remove air pockets. The KERDI is carried to the step in the fleece-laminated bonding flange (template provided). Be sure the connection between the KERDI and KERDI-DRAIN is secure.
Note: A sheet of cardboard can be placed on the floor to protect the KERDI during subsequent steps.
4. Construct floor/wall, floor/curb, and wall/wall connections using Schluter-KERDI-BAND or cut sections of KERDI. Seams are easily constructed by overlapping the edges of KERDI or KERDI-BAND by 2" (50 mm) using an unmodified thin-set mortar.
5. Seal the shower curb/wall junctionusing Schluter-KERDI-KERECK or Schluter-KERDI-KERECK-F inside and outside corners and unmodified thin-set mortar.
6. Apply a bond coat of thin-set mortar to the shower walls and curb using a 1/4" x 3/16" V-notched trowel. Embed the KERDI in the thin-set mortar and work the membrane onto the entire surface to ensure full coverage and remove air pockets. The KERDI is
carried to the height of the showerhead (at minimum).
Note:The thin-set mortar used for bonding Schluter®-KERDI to the walls and curb must be appropriate for the substrate and must penetrate and engage the KERDI fleece. For most substrates (e.g., drywall or CBU), an unmodified thin-set mortar is used. Seams in the membrane are constructed by overlapping the edges of KERDI or KERDI-BAND by 2" (50 mm) using an unmodified thin-set mortar.
Note: Any protrusions through the KERDI membrane (e.g., mixing valve, shower head, etc.) must be treated with Schluter-KERDI-BAND and Schluter-KERDI-FIX, or equivalent sealant, to ensure a watertight seal.
7. Once the entire membrane, including seams, corners, curbs, and connection to drain, have been completely bonded and, therefore, waterproofed, the assembly is ready to be tiled.
Note: Prior to setting tile, if the assembly is to be water tested, wait 24 hours to allow for final set of the mortar before testing to ensure waterproof performance of the assembly at seams and connections.
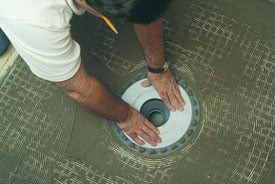
8. The grate assembly, which is comprised of a square grate, the height adjustment ring, and the lateral adjustment ring, is set with unmodified thin-set mortar. The height of the grate is adjusted via the height adjustment collar and aligned flush with the top of the covering. Since the diameter of the height adjustment collar is smaller than the opening of the bonding flange, the grate can be positioned to match the joint pattern of the tile covering.
9. For tile installations using the thin-bed method, apply unmodified thin-set mortar directly to the exposed Schluter-KERDI surface and install the tiles, ensuring full coverage. For acid-resistant coverings, use an epoxy adhesive to set and grout the tile.
Shower Bases Constructed with Schluter Prefabricated Shower Substrate
1. The substrate must be clean, even, and load bearing. Any leveling must be done prior to placing the tray. If necessary, cut the KERDI-SHOWER-ST tray to size prior to application. The tray should be cut by equal amounts on all four sides to ensure a consistent height of the first course of tile. After locating the correct position (use KERDI-SHOWER-ST as a template), cut a hole in the substrate for the drain.
2. Apply unmodified thin-set mortar to the substrate using a 1/4" x 3/8" (6 mm x 10 mm) square- or U-notched trowel. Place the KERDI-SHOWER-ST, making certain to solidly embed the tray in the mortar. Check the underside of the tray to ensure that full coverage is achieved.
3. If necessary, cut the KERDI-SHOWER-SC to length with a handsaw. Apply unmodified thin-set mortar to the floor and to the edge of the shower tray using a 1/4" x 3/8" (6 mm x 10 mm) square- or U-notched trowel, and press the curb firmly into place.
4. If there is access to the plumbing from below and the waste line can be connected after installing Schluter-KERDI-DRAIN, apply unmodified thin-set mortar to completely fill the step in the shower tray using a 1/4" x 3/16" (6 mm x 5 mm) V-notched trowel. Press Schluter-KERDI-DRAIN firmly into the mortar, ensuring full support of the bonding flange. When job conditions require the setting of Schluter-KERDI-DRAIN by the plumber prior to the installation of the Schluter-KERDI-SHOWER-ST tray (or when there is no access to the plumbing from below), install the KERDI-DRAIN to the appropriate height using the detachable center section of the tray or the foam spacers included with the drain. Before installing the Schluter-KERDI-SHOWER-ST tray, apply thin-set mortar to the substrate and to the top and bottom of the detached center section. Slide the center section into place below the drain to ensure solid and uniform support of the bonding flange.
Note: Schluter-Systems recommends installing the KERDI-SHOWER-ST tray prior to setting KERDI-DRAIN whenever possible. This method affords the installer greater control over the final position of the drain and makes it easier to obtain full support under the bonding flange.
5. Apply a bond coat of unmodified thin-set mortar to the tray and bonding flange using a 1/4" x 3/16" V-notched trowel. Embed Schluter-KERDI in the thin-set mortar and work the membrane onto the entire surface to ensure full coverage and remove air pockets. The KERDI is carried to the step in the fleece-laminated bonding flange (template provided). Be sure the connection between the KERDI and KERDI-DRAIN is secure.
Note: A sheet of cardboard can be placed on the floor to protect the KERDI during subsequent steps.
6. Construct floor/wall, floor/curb, and wall/wall connections using Schluter-KERDI-BAND or cut sections of KERDI. Seams are easily constructed by overlapping the edges of KERDI or KERDI-BAND by 2" (50 mm) using an unmodified thin-set mortar.
7. Seal the shower curb/wall junction using Schluter-KERDI-KERECK or Schluter-KERDI-KERECK-F inside and outside corners and unmodified thin-set mortar.
8. Apply a bond coat of thin-set mortar to the shower walls and curb using a 1/4" x 3/16" V-notched trowel. Embed the KERDI in the thin-set mortar and work the membrane onto the entire surface to ensure full coverage and remove air pockets. The KERDI is carried to the height of the shower head (at minimum).
Note: The thin-set mortar used for bonding Schluter-KERDI to the wallsand curb must be appropriate for the substrate and must penetrate and engage the KERDI fleece. For most substrates (e.g., drywall or CBU), an unmodified thin-set mortar is used. Seams in the membrane are constructed by overlapping the edges of KERDI or KERDI-BAND by 2" (50 mm) using an unmodified thin-set mortar.
Note: Any protrusions through the KERDI membrane (e.g., mixing valve, shower head, etc.) must be treated with Schluter-KERDI-BAND and Schluter-KERDI-FIX, or equivalent sealant, to ensure a watertight seal.
9. Once the entire membrane, including seams, corners, curbs, and connection to drain, have been completely bonded and, therefore, waterproofed, the assembly is ready to be tiled.
Note: Prior to setting tile, if the assembly is to be water tested, wait 24 hours to allow for final set of the mortar before testing to ensure waterproof performance of the assembly at seams and connections.
10. The grate assembly, which is comprised of a square grate, the height adjustment ring, and the lateral adjustment ring, is set with unmodified thin-set mortar. The height of the grate is adjusted via the height adjustment collar and aligned flush with the top of the tile covering. Since the diameter of the height adjustment collar is smaller than the opening of the bonding flange, the grate can be positioned to match the joint pattern of the tile covering.
11. For tile installations using the thin-bed method, apply unmodified thin-set mortar directly to the exposed Schluter-KERDI surface and install the tiles, ensuring full coverage. For acid-resistant coverings, use an epoxy adhesive to set and grout the tile.
|
Material
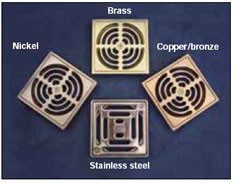
The drain casing, height adjustment collar, lateral adjustment ring, and strainer are made of acrylic nitrite butadiene styrol (ABS). The drain casing is also available in PVC and features a fleece-covered bonding flange. The grate is available in stainless steel 304 (1.4301 = V2A) and anodized aluminum with a brushed copper bronze, brushed brass, or brushed nickel finish.
The Schluter-KERDI-DRAIN grate, in anodized aluminum, must be tested to verify its suitability if chemical exposure is expected. Cementitious materials, in conjunction with moisture, become alkaline. Since aluminum is sensitive to alkaline substances, exposure to the alkali (depending on the concentration and duration of exposure) may result in corrosion (aluminum hydroxide formation). Therefore, it is important to remove mortar or grout residue from visible surfaces. In addition, ensure that the grate is solidly embedded in the setting material and that all cavities are filled to prevent the collection of alkaline water. The anodized layer retains a uniform appearance during normal use. The surface, however, is susceptible to scratching and wear and may be damaged by grout or setting material. Therefore, these materials must be removed immediately.
The Schluter-KERDI-DRAIN grate, in stainless steel, is roll-formed using 304 (1.4301 = V2A) stainless steel. Therefore, the grate’s appearance differs from those made of anodized aluminum. The stainless steel material can sustain high mechanical stresses and is especially well suited for applications requiring resistance against chemicals and acids.
Note: KERDI-DRAIN is listed by UPC (IGC 195-2004), CSA (B79-94), and NSF (SE AD 130-007). For copies of the above listings, please contact Schluter-Systems at 1- 800-472-4588 (USA) or 1-800-667-8746 (CAN), or e-mail us at info@schluter.com.
|
Maintenance
Schluter-KERDI-DRAIN requires no special maintenance and is resistant to mold and fungi. Clean the grate using common household cleaning agents. The grate may be removed to clean the drain housing and the drainpipes.
Stainless steel grates exposed to the environment or aggressive substances should be cleaned periodically using a mild household cleaner.
Regular cleaning maintains the neat appearance of stainless steel and reduces the risk of corrosion. All cleaning agents must be free of hydrochloric and hydrofluoric acid. Stainless steel surfaces develop a sheen when treated with a chrome polishing agent.
In the case of the anodized aluminum grates, do not use abrasive cleaning agents. Damage to the anodized layer can be repaired by applying varnish.
|
Products
Ø = in. - cm |
Item No. |
Materials |
w/ Stainless steel 304 grate (E) |
11-7/8" - 30 cm |
KD2/PVC/E |
PVC |
11-7/8" - 30 cm |
KD2/ABS/E |
ABS |
w/ Brushed brass anodized aluminum grate (AMGB) |
11-7/8" - 30 cm |
KD2/PVC/AMGB |
PVC |
11-7/8" - 30 cm |
KD2/ABS/AMGB |
ABS |
w/ Brushed copper/bronze anodized aluminum grate (AKGB) |
11-7/8" - 30 cm |
KD2/PVC/AKGB |
PVC |
11-7/8" - 30 cm |
KD2/ABS/AKGB |
ABS |
w/ Brushed nickel anodized aluminum grate (ANIGB) |
11-7/8" - 30 cm |
KD2/PVC/ANIGB |
PVC |
11-7/8" - 30 cm |
KD2/ABS/ANIGB |
ABS |
Item No. |
Description |
KD/TPSCRW |
Tamper proof screw |
KD/TPWRCH |
Wrench |
|
Shower Systems FAQ
Q. Why should I use the Schluter-Shower System?
A. The Schluter-Shower System is an integrated family of products that together form a fully bonded, watertight assembly for tiled showers. Unlike shower pan liners in conventional assemblies, bonded waterproof membranes, such as Schluter-KERDI, bond directly to the mortar bed and protect it from becoming saturated with regular use. In addition, KERDI protects wall cavities from vapor penetration. The Schluter-KERDI-DRAIN provides a simple and secure connection to the KERDI membrane at the top of the assembly. Other components include the Schluter-KERDI-FIX sealant, used to treat protrusions through the membrane, and the Schluter-KERDI-SHOWER-ST/-SC/-SR prefabricated EPS substrates, which can reduce weight and installation time by replacing the mortar bed. The integrated Schluter-Shower System eliminates the potential for leakage, efflorescence, and mold growth in the system, is maintenance-free, and dramatically reduces total installation time to ensure success and make shower installation easier than ever.
Q. Can I use Schluter-KERDI in my steam shower?
A. Yes. Schluter-KERDI has a low water vapor permeance (0.75 perms), allowing it to function both as a waterproofing membrane and vapor retarder in steam showers.
Q. What are the Schluter-KERDI-SHOWER-ST/-SC tray and curb made of? Can they really support the tile assembly?
A. The Schluter-KERDI-SHOWER-ST/-SC tray and curb are made of expanded polystyrene (EPS) foam with a high compressive strength (57 psi). They provide a convenient, lightweight, and stable substrate for the Schluter-KERDI waterproofing membrane and tile. After the tile is installed and grouted, the assembly will support all the loads typical of tiled showers. This can include glass doors or glass block walls.
Q. My shower isn’t the same size as the Schluter-KERDI-SHOWER-ST tray. Can I modify the tray to fit my shower?
A. Yes. The Schluter-KERDI-SHOWER-ST tray can be cut to size to fit various applications. Ideally, the tray should be cut by equal amounts on all four sides to ensure a consistent height of the first course of wall tile. However, slight differences can typically be made up with thin-set mortar when setting the floor tile. The shower base can also be extended past the perimeter of the shower tray using dry pack mortar.
Note: The Schluter-KERDI-SHOWER-SC curb can be cut to size to fit various applications. In addition, multiple curbs (or cut sections of curb) can be placed consecutively to form longer runs, including angled designs.
Q. Can I install Schluter-KERDI over drywall in my tiled shower?
A. Yes. Once you install Schluter-KERDI over the drywall panels, they will be completely protected from the water and vapor in your tiled shower.
Q. I’m installing Schluter-KERDI over drywall in my shower. Do I need to tape the joints between panels before installing the KERDI?
A. No. It is not necessary to tape the joints between drywall panels before installing Schluter-KERDI. If you must tape the joints per fire code requirements, make sure to apply a latex primer over the taped joints before installing KERDI. Joint compound can be water soluble and should be protected from the moisture in the thin-set mortar used to install KERDI.
Q. What size trowel should I use to install Schluter-KERDI?
A. A 1/4" x 3/16" V-notched trowel is recommended. Mix your thin-set mortar to a fairly fluid consistency (but still able to hold a notch) and solidly embed the Schluter-KERDI into the fresh mortar with the flat side of the trowel (a drywall knife is handy for this purpose as well). It is good practice to periodically lift a corner of the KERDI after embedding it in the thin-set mortar to check the fleece for full coverage.
Q. What type of thin-set mortar should I use when installing Schluter-KERDI?
A. The thin-set mortar used for bonding Schluter-KERDI must be appropriate for the substrate and must penetrate and engage the KERDI fleece. For most substrates (e.g., drywall, cement backerboard, dry pack mortar, and the Schluter-KERDI-SHOWER-ST/-SC/-SR EPS foam substrates), an unmodified thin-set mortar meeting the requirements of ANSI A118.1 is recommended. When installing KERDI with unmodified thin-set mortar over particularly dry and porous substrates, it is recommended to wet the substrate first, in order to help prevent premature drying or skinning of the thin-set mortar. Unmodified thin-set mortar must be used to construct all KERDI seams to ensure watertight performance of the system.
Q. What type of thin-set mortar should I use when installing ceramic and stone tile over Schluter-KERDI?
A. Unmodified thin-set mortar is recommended to set ceramic and stone tile over the KERDI membrane.
Portland cement-based unmodified thin-set mortars are dependent on the presence of moisture for hydration in order to gain strength. Since Schluter-KERDI is impervious, it does not deprive the mortar of its moisture. This allows the cement to properly hydrate, resulting in a strong, dense bond coat. In fact, after the mortar has reached final set (usually within 24 hours), unmodified thin-set mortars achieve higher strengths when cured in continually moist conditions.
Exceptions: Certain moisture-sensitive stones, e.g., green marble, or resin-backed tiles may not be appropriate for use in wet areas or may require special setting materials. Please consult the stone supplier and Schluter-Systems for more information. For an acid-resistant covering, use an epoxy adhesive to set and grout the tile. However, do not use epoxy to install the Schluter-KERDI membrane.
Modified thin-set mortar is not recommended to set ceramic and stone tile over the KERDI membrane.
Modified thin-set mortars must air dry for the polymers to coalesce and form a hard film in order to gain strength. When sandwiched between two impervious materials such as Schluter-KERDI and ceramic tile, including porcelain tile, drying takes place very slowly through the open joints in the tile covering. [According to the Tile Council of North America’s Handbook for Ceramic Tile Installation, this drying period can fluctuate from 14 days to over 60 days, depending on the geographic location, the climatic conditions, and whether the installation is interior or exterior]. Therefore, extended cure times would be required before grouting if using modified thin-set mortars between KERDI and ceramic tile, including porcelain tile. If extended cure times were not observed, the results could be unpredictable. This is even more important to consider in wet areas such as showers as there is the additional concern of latex leaching.

Q. How do I know if the thin-set mortar is modified or unmodified?
A. In general, unmodified thin-set mortar is a blend of Portland cement, sand, and water retention agents that is mixed with water by the user. The appropriate product standard for unmodified thin-set mortars is ANSI A118.1. Look for this standard on the packaging (e.g., product meets ANSI A118.1 when mixed with water). Unmodified thin-set mortar may also be referred to as dry-set mortar by the manufacturer.
Modified thin-set mortars are similar to unmodified thin-set mortars, but include additional polymers such as latex. The additional polymers are introduced in either liquid or powder form. In the first case, the user mixes an unmodified or dry-set mortar powder with a liquid polymer additive instead of water. In the second case, the polymers are added by the manufacturer to the dry blend in powder form. The user then mixes the powder with water. The appropriate product standards for modified thin-set mortars include ANSI A118.4 and ANSI A118.11.
Q. Can I use a premixed thin-set mortar to install Schluter-KERDI and tile in my shower?
A. No. Schluter-Systems does not recommend the use of premixed thin-set mortars (mastics/adhesives) in any Schluter-KERDI installation.
Q. I accidentally poked a hole through the Schluter-KERDI while installing the membrane. Do I need to start over or can I simply repair the hole?
A. Holes can typically be repaired by installing a “patch” of Schluter-KERDI or Schluter-KERDI-BAND with unmodified thin-set mortar, making sure to provide a 2" overlap in all directions. Small penetrations may also be repaired using the Schluter-KERDI-FIX sealant.
Q. Can I install glass tile over Schluter-KERDI?
A. Glass tiles are unique products and may require special consideration. Please call Schluter-Systems at (800) 472-4588 to discuss your particular application before installing glass tile over Schluter-KERDI.
Q. What is a water test? How do I perform one on the Schluter-Shower System?
A. A water test is a quality control check performed on any shower installation before setting tile. It basically consists of stopping the waste line with a test plug and filling the base of the shower stall with water to check for leaks. You can quickly check the test plug by filling the pipe and drain with water up to the height of the Schluter-KERDI-DRAIN integrated bonding flange (or a little below). If the plug is watertight, then you can continue filling the assembly. The water level is marked and the assembly is left for a specified amount of time (24 hours is typical). If there are no leaks, the shower passes.
Notes:
We recommend waiting a minimum of 24 hours after setting Schluter-KERDI to begin water testing. This will allow the thin-set mortar to reach final set and ensure watertight performance at the seams under normal curing conditions (i.e., room temperature). If temperatures are much lower (e.g., around 50 or 60 degrees), then it is best to wait longer.
If you are building a barrier-free shower, then you will need to provide a temporary dam (e.g., a 2x4 and silicone sealant) at the threshold
|
|
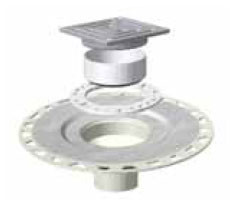
Schluter®-KERDI-DRAIN floor drain assembly is designed with a sloped, integrated bonding
flange to provide a secure connection to KERDI and other bonded waterproof membranes.
Unique Features and Benefits:
- Appropriate for both mortar bed and KERDI-SHOWER-ST tray installations.
- Features a fully adjustable square grate and accommodates a wide range of tile thicknesses
1/4" to 1-1/4" (6 mm to 31 mm). Grate is available in stainless steel (E),
brushed brass anodized aluminum (AMGB), brushed copper/bronze anodized
aluminum (AKGB), and brushed nickel anodized aluminum (ANIGB).
- Ideal for new construction and renovation work.
- Saves installation time and labor, as it eliminates the prep work required for a
traditional two-step mortar pan.
Schluter®-KERDI-DRAIN is listed by UPC®, CSA, and NSF.
1. Grate
2. Height adjustment collar
3. Lateral adjustment collar
4. Fleece-laminated bonding flange |
|
Back to Schluter System
|
Schluter Kerdi - Schluter Kerdi Drain - Schluter Rema - Schluter ST SC SR - Schluter Ditra - Kerdi Fix
How To Install
|
This page was created by tiledepot you may view it for personal use only,
and for flooringsupplyshop.com customers only. DO NOT copy for commercial use. copyright material of www.flooringsupplyshop.com & International Flooring Center, inc. |
|