
Composeal Gold – Crack Isolation Waterproofing Membrane
Flexible Crack Isolation Waterproofing for Floors – Walls – Roof Deck / Terraces – Under “thick bed” Tile Installations
INSTALLATION PRODUCTS
COMPOSEAL GOLD MEMBRANE
The new standard of excellence in Crack Isolation Waterproof Membranes. GOLD is available in standard 5 foot wide, 450 sq. ft. rolls.
PRE-FORMED GOLD CORNERS
For installations requiring waterproofing, GOLD Corners are available in inside or outside configurations
COMPOSEAL FLEXIBLE PVC CEMENT
Composeal’s flexible PVC cement makes a strong chemical, waterproof weld between sheets of GOLD. For welding GOLD seams and GOLD corners.
COMPOTITE ELASTISEAL
A high tack, fast curing sealant used to obtain a “gasket type” seal around corners, drains, pipes, conduits, fixtures flashings and penetrations.
INSTALLATION TOOLS
MEASURING, MARKING and CUTTING TOOLS
A measuring tape, chalk line and utility knife will be required for laying out and cutting your installation of Composeal GOLD
NOTCHED TROWEL
A notched trowel will be required to spread the bonding material you choose. When using a slurry coat of latex fortified thin-set mortar, use a 3/16″ V notch
100 lb. ROLLER
Composeal GOLD must be fully embedded into the bonding material. The 100 lb. roller applies pressure and removes trapped air when slowly and evenly worked across freshly installed Composeal GOLD.
HAND ROLLERS
Used to fully embed GOLD into the bonding material on vertical applications or areas too hard to reach with the 100 lb. roller, and to ensure welding of seams and corners when using Flexible PVC Cement
CAULKING GUN
If Compotite Elasti-Seal is to be used, a good quality heavy duty caulking gun will be required for application.
GENERAL INFORMATION
COMPOSEAL GOLD is the first Three-Ply Heat Fused Crack Isolation Waterproof Membrane for thin-set tile and stone installations.
GOLD is bonded directly to the clean, dry substrate of concrete, “mud” beds, cement backer boards, or drywall, and the tile or stone is thin-set directly to the GOLD. This powerful protection adds less than 1/8″ to 1/4″ to the overall thickness of the finished installation.
(Plywood must first be covered by a 1 1/4″ to 2″ wire-reinforced mortar bed or by cementitious backer units(CBUs) before using GOLD and setting tile above it if moisture absorption by plywood is expected.)
GOLD is intended for use as a Crack Isolation membrane to prevent cracks in the substrate from “telegraphing” through to the finish surface*. Composeal GOLD can easily be installed to provide a completely waterproof thin-set tile installation.
GOLD may be used in interior or exterior areas, but is not in-tended for use as a single-ply roof membrane over occupied space. GOLD is not intended for use in bridging over expansion joints of any kind but can be carried through such joints (see Composeal GOLD Sweets brochure and Data Sheet 92-1).
* Most substrate cracks can be neutralized by GOLD. Structural cracks or cracks resulting from building settlement or movement are by definition dynamic and may move more than GOLD (or any other material) can compensate for. Inspect the crack thoroughly to determine its nature. The following are among the warning signs of structural cracking: 1) Crack varies in width. 2) Crack is higher on one side than on the other side. 3) Slabs adjacent to the crack are not level with each other. If any above condition is present, causes of the problem should be determined and corrected. No tile installation can hold together deficient structures, or compensate for flawed designs.
BEFORE YOU BEGIN
- Determine your needs. Do you want crack isolation only, or do you require waterproofing as well? For crack isolation only, follow all instructions printed in black. For waterproof installations, you must also follow the instructions printed in blue.
- Check the substrate for bond-ability. All surfaces must be structurally sound, clean, dry and capable of supporting the weight of a tile installation. Concrete surfaces must be checked for bond-ability. Apply a single drop of water to the concrete surface. If it soaks in within a few seconds, the slab is bond-able. If residual curing compounds, sealers, grease or other bond breakers are present, the drop will remain beaded on the slab for a minute or more. It is a standard industry practice that all such bond-breaking agents must be removed before a thin-set installation is attempted. If surface is rough or uneven, patch or level first with cement based patching compound. Correct all substrate deficiencies before installing GOLD. Check substrate for proper drainage and slope to drain, if applicable. Any existing flashing’s must be inspected and found to be properly designed and installed before GOLD is installed.
- Consider your layout. It is best to carefully plan your installation to minimize traffic over freshly installed GOLD. Careful planning will also minimize cuts and seaming, saving time and money.
- Select your bonding material. When cement thin-set is used as a bonding agent for GOLD, no foot traffic should be allowed until mortar is fully cured (4-48 hrs.), otherwise De-bonding, loose spots or bubbles may occur. Rapid setting mortars allow same day setting of the tile above membrane.
- Locate the proper tools. If you can’t locate the tools shown on the other side of this page, contact your Composeal distributor for help.
- Understand these instructions. Be sure you are comfortable with all installation procedures and techniques before you begin your project.
- Technical support, full specifications and Material Safety Data Sheets for individual products may be obtained from Compotite Corporation at 800-221-1056.
HOW TO INSTALL

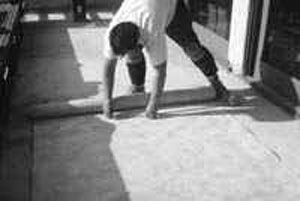
1. Carefully lay out installation to minimize cuts and seams. Chalk line sheet locations
Lay out your installation (Fig. 1). Prepare a rough sketch of your installation showing direction and lengths of GOLD required. Locate walls, angles, protrusions, location of expansion joints, etc. Be sure to allow for 2″ overlap at all seam locations, 4-6″ for upturn at walls when waterproofing. Use chalk to outline sheet locations on the substrate. It is usually best to pre-cut sheets needed prior to installation (Fig. 2).
2. Pre-cut GOLD to fit layout. For waterproofing, pre-cut flashing pieces save time in tight space
“Flash” GOLD at walls and edges. For waterproof installations, GOLD should be turned up wall at least to flood point, or to height of base tile. GOLD sheets may be cut oversize to allow for upturns at walls, and creased for a tight fit at floor/wall juncture. Be sure to crease material so the “curl” of the material pushes back to the wall or floor. For tight spaces, or where a lot of flashing is required, pre-flashing will save installation time. Flashing pieces and pre-formed corners should be lapped in direction of water flow to drain.
3. If using thin-set for bonding, mix per manufacturer’s instructions. Set tile after full mortar cure
Bonding GOLD to substrate. When using latex Portland cement mortar, mix as per manufacturer’s instructions. To bond GOLD to substrate (Fig. 3), use a 3/16″ V-notch trowel. Place GOLD sheets while slurry is still wet (do not allow to skin). Occasionally pull up a freshly installed sheet to confirm 100% coverage. (A larger notch trowel may be required to achieve 100% coverage)

4. Place GOLD into bonding material. Allow 2″ overlap to all adjacent sheets and flashing’s
Placing GOLD into bonding material (Fig. 4). When placing GOLD, try to stay off previously installed GOLD, and be sure to allow for 2″ overlap at all seam locations.
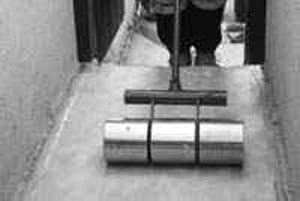
5. Fully embed GOLD into bonding material and remove air pockets using rollers
Rolling to embed GOLD (Fig. 5). Use the 100 lb. roller or hand rollers immediately after the GOLD sheets are placed into the bond coat. Apply pressure and roll from center of sheet to outer edges to remove all air pockets, then forward and back across the GOLD to ensure proper bedding. Use hand rollers for seams, vertical and hard to reach areas.
When rolling, if adhesive or thin-set squeezes out at seams, reduce quantity of bonding material applied with notched trowel.

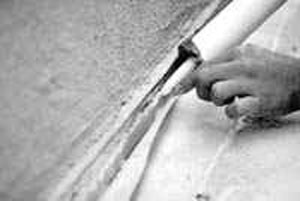
6. Weld all seams and corners using Composeal Flexible PVC Cement
Welding seams and corners (Fig. 6). Seaming is required for all installations. Pre-formed corners are required in waterproof installations. Sheets of GOLD must always be welded using Composeal Flexible PVC Cement. Welding can be done as sheets of GOLD are laid (advised when bonding with thin-set), or after all sheets have been installed. Dispense PVC Cement out of can using dauber in cap, or decant into a larger container and apply cement with a 1″ wide brush. Apply PVC Cement liberally to both sides of the seam, working well into the scrim fabric. Sometimes a second application is required if cement has totally absorbed into scrim. ALLOW CEMENT TO AIR 1-2 MINUTES UNTIL TACKY, then join seams and roll with hand roller. GOLD pre-formed corners are to be welded the same way. Flood testing may be conducted 4 hours after seaming.
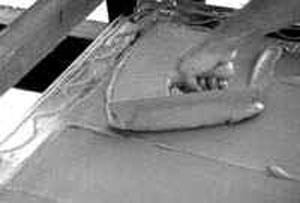
7. When waterproofing, use Elasti-seal to bond GOLD to flashing’s, protrusions, drains
Sealing at flashings, penetrations and drains (Fig. 7). All flashings and penetrations of pipes, conduits, fixtures, etc. must be sealed using Compotite Elastiseal. Apply a liberal amount of Elastiseal to both the penetrating object, and to the GOLD membrane to assure continuous contact. At drains, the GOLD membrane should be sealed to drain body both above and below the membrane. FOR SHOWER DRAINS, CODE REQUIRES a two-piece clamping ring type drain with weep holes, set in mortar. GOLD membrane is installed over the lower flange, and drain opening is cut out to inside diameter of drain. Bolt holes are punched with nails, and a bead of Elastiseal is applied under GOLD membrane before top half of drain is bolted on securely and a flood test is done.
Installing Tile or Stone. Use latex or acrylic fortified thin-set only. 100% coverage of bond coat to GOLD is required for highest performance levels. When using a cement thin-set bonding mortar, stay off freshly installed GOLD until the mortar is cured sufficiently to withstand foot traffic without De-bonding. With cement thin-set, this may require 4-48 hours or more. Use of rapid setting mortars reduces this wait.
CODES, CERTIFICATION
COMPOSEAL 30 and 40 comply with the three major plumbing codes: UPC-IAPMO, SBCCI and BOCA. COMPOSEAL has separate municipal approval where required, e.g. City of Los Angeles, City of Philadelphia (40 mil), Metropolitan Dade County and Commonwealth of Massachusetts. (Approval is no longer required in New York City for concealed PVC waterproof membrane).
COMPOSEAL also complies with the Corps of Engineers specs for PVC shower pan material (para 5.8.3.2 15 p1-18) and meets the requirements of FHA Publication 4900.1.
WARRANTY: COMPOSEAL 30 and 40 are warranted against failure for any reason, and in the event of failure, replacement material will be supplied at no charge. This warranty applies only to the membrane itself and not to the manner of installation over which we have no control, and it does not extend to consequential damage or other implied responsibility. COMPOSEAL should last the life of the building.
OPERATION, MAINTENANCE
COMPOSEAL requires no maintenance and should last the life of the building.
MATERIALS, FINISHES
CEMENT WELDING: COMPOSEAL may be welded by the use of flexible vinyl solvent cement which gives instant contact strength. COMPOSEAL SOLVENT CEMENT is available for this purpose. Use only Compotite approved PVC cement for seaming and welding Composeal. Lay sheets with an overlap of two inches with upper lap edge towards direction of watershed. Fold back top edge and apply the cement to both surfaces. Place together after surfaces become tacky, about two minutes, and press or roll with a roller, first lightly so as to avoid slippage, then firmly, but not so hard as to distort the material
Technical Data
COMPOSEAL 30 and 40 meet the engineering requirements of the American Society for Testing and Materials (ASTM) and the Ceramic Tile Institute (CTI). ASTM D4551 is the test standard established by ASTM
“for PVC flexible sheeting which is used with mastic, bedding or coating for construction of concealed water-containment membranes in applications where there is potential for costly secondary damage from water leakage and very long term reliable performance is essential. The tests are intended to ensure quality and performance.”
COMPOSEAL 30 and 40 meet and surpass these ASTM standards.
COMPOSEAL 30 and 40 also meet the CTI requirements for waterproof membranes.
TESTED MATERIAL
CERAMIC TILE INSTITUTE OF AMERICA
These tests were conducted by the United States Testing Co., Test Report No. LA 63554, Smith Emery Co., Test No. T-88-122A-B, and Truesdail Laboratories, Report # 24371-1.
Tile work shall comply with recommendations of “Handbook for Ceramic Tile Installation” published by the Tile Council of America, Inc., P.O. Box 2222, Princeton, N.J. 08543
* These drawings based on sketches in “Handbook for Ceramic Tile Installation.”
| Engineering Properties | ASTM D 4551 Spec
Grade 30 |
ASTM D 4551 Spec
Grade 40 |
Composeal Test Results .030 | Composeal Test Results .030 |
|---|---|---|---|---|
| Thickness, inches | 0.30″ | 0.40″ | 0.31″ | 0.42 |
| Tensile Strength. lbs/in. width | 60-lb min. | 80-lb min. | 89-lb (2870 psi) | 113-lb (2700 psi) |
| Tensile Strength. at 100% elongation | 30-lb min. | 40-lb min. | 43-lb | 57-lb |
| Ultimate elongation before breaking | 300% Min | 300% Min | 400% + | 400% + |
| Tear Resistance. lbs/in width | 185-lb min. | 250-lb min. | 260-lb | 263-lb |
| Pinholes | None | None | None | None |
| Micro-Organism Resistance (fungus, mildew, mold) | No Growth | No Growth | No Growth | No Growth |
| Chemical Resistance: | ||||
| Distilled H2O % wt. change* | 1% max | 1% max | + 0.4% | + 0.4% |
| Soapy H2O % wt. change* | 2% max | 2% max | + 0.5% | + 0.3% |
| Alkali, pass/fail (hydrostatic) | Pass | Pass | Pass | Pass |
| Shrinkage, dimension change at 158 F ASTM 1204 | 5% max | Pass | 1.3% | 2.9% |
| Volatility, % loss at 158 F after aging | 1.5% max | 1.5% max | None | None |
| Hydrostatic pressure (to test water penetration): | ||||
| Original Condition | Pass | Pass | Pass | Pass |
| After Folding test (cold crack, 4hrs @ 0F) | Pass | Pass | Pass | Pass |
| After Puncture test | Pass | Pass | Pass | Pass |
| After Indentation test | Pass | Pass | Pass | Pass |
No evidence of surface wetness or other signs of water penetration was detected on any of the tested specimens.
Additional Test :
Seam, (lap joint) strength ASTM D751 CTI Standard – 8 lbs./in. min. / Composeal 30 – 69 lbs./inch / Composeal 40 – 85 lbs./inch
Specific Gravity: 1.29 @ g/cm3
Cold Crack: passed @ 53 F
ASTM Standard D1004, d 412 d1790, e 96 and FHA Spec. 4900.1 are also met by Composeal
*Measure of water/ chemical surface absorption
Made in USA – 100% American Labor and Materials.
Composeal Gold Installation Instructions
Composeal Blue Vinyl Shower Pan Membrane How to Install
Solution for Types of Concrete Cracks
The post Composeal Gold Installation Instructions first appeared on Flooring Supply Shop Blog.
In reply to vincent fuller.
Hello Vincent
The answer to all your questions can be found on the Product page https://www.flooringsupplyshop.com/category/waterproofing-membranes-134
the roll width are 5 ft and their is inside and outside corners available
What is the largest width of a roll? The white gold sound water and crack isolation 50 ml. How much is the cost for a roll? Does it come with pre formed corners inside and outside? How much for a case of elasto-seal caulk tubes? 4 cans of composeal flexable pvc cement?