Composeal Blue Vinyl Shower Pan Membrane
Installation Instruction
INSTALLATION PRODUCTS
COMPOSEAL BLUE VINYL SHOWER PAN Available in 30 or 40 mil thicknesses, Composeal Blue Vinyl is made in the USA, is compliant with all major plumbing codes and is a CTI Tested Material.
PREFORMED CURB CORNERS PreFormed Corners are required by Code at curb locations and outside corners. Composeal’s 3-way Corner design handles all types of corner situations.
COMPOSEAL FLEXIBLE PVC CEMENT Composeal’s flexible PVC cement makes a strong chemical, waterproof weld between sheets of Composeal Blue Vinyl. For welding and seaming pan and corners.
COMPOTITE ELASTISEAL A high tack, fast curing sealant used to obtain a “gasket type” seal at drains, flashings, corners and penetrations. Cures in 6 hours or less.
INSTALLATION TOOLS
MEASURING, MARKING and CUTTING TOOLS
A measuring tape, chalk line, markers and utility knife will be required for laying out and cutting your installation of Composeal Blue Vinyl.
CAULKING GUN
A good quality heavy duty caulking gun will be required for application of Compotite ElastiSeal at drain locations.
GENERAL INFORMATION
COMPOSEAL BLUE VINYL SHOWER PAN has been job proven in hundreds of thousands of installations nationwide since 1979 with no reported material failures.
Proper installation is the key to a long lasting waterproof shower pan installation.
An installation video, technical support, specifications and Material Safty Data Sheets may be obtained from FlooringSupplyShop at contact@flooringsupplyshop.com or on our web site
BEFORE YOU BEGIN
CHECKLIST
CHECK LOCAL PLUMBING CODE to determine choice of 30 or 40 mil Composeal. (Example: UPC requires 15 lb. felt under 30 mil pan, City of Los Angeles doesn’t).
DRAIN must be two-part clamping drain with weep holes.
SUBSTRATE must be sloped to drain 1/4″ per foot. If not sloped, see following instructions for ways to slope floor.
PRE-FORMED CURB PROTECTORS: UPC requires these at curb corners. Composeal three-way corners/ curb protectors
COMPOSEAL FLEXIBLE PVC CEMENT to weld corner/ curb protectors in place, and for welding seams.
PROVIDE BLOCKING at base of shower walls to support and affix Composeal Shower Pan.
PROTECTIVE COVER. Have available cardboard, drywall or such to cover Composeal installation.
HAVE SUFFICIENT COMPOSEAL ON HAND FOR JOB. Composeal is available in 4′, 5′, and 6′ widths. Assuming a 6″ high curb, allow a minimum wall turn-up of 9″ (3″ above curb height) and a minimum of 16″ for wrapping around entire curb.
HOW TO INSTALL
CUT and PLACE PAN
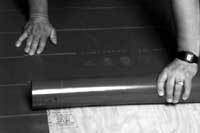
Lay out and cut your Composeal Shower Pan outside the shower stall (see fig. 2).
Measure the inside dimensions of the shower floor and add a minimum of nine inches for each wall. Be sure to allow enough material to extend up and over entire shower curb, including the front of the curb.
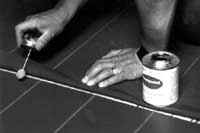
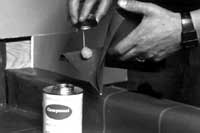
When necessary, seaming is easily accomplished using Composeal Flexible PVC Cement (see fig. 3).
Lay sheets with an overlap of 2″ with upper lap edge toward direction of drainage.
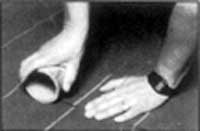
Apply the PVC Cement to both surfaces. Place surfaces together after becoming tacky (about 2 minutes) and press or roll seam (fig. 4).
Carry pan into shower and place against back wall.
ATTACH PAN and PREFORMED CORNERS
Place top edge of shower pan at least 3″ above top of shower curb .
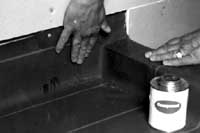
Composeal may be fastened directly to wood studs using roofing nails, or to wood or metal studs using screws and washers (see fig. 5). Make sure no penetrations occur less than 2″ above top of dam. Pan is not to be attached to the sloped bed or sub-floor.
If drywall or cement backer board is to be installed over the studs, 1/4″ shims should be attached to the stud faces. This will space the board out to extend straight down and over the pan. If metal lath is to be installed to provide for a mortar installation on the walls, then no shims are needed, the paper and lath simply extend down and over the pan. Remember, no penetrations of fasteners for the pan, board or lath lower than 2″ above the shower curb.
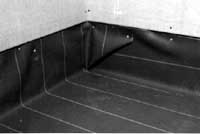
Inside corners should be folded with a “dog ear” preferably tucked behind and nailed at the top edge (see fig. 6)
At outside corners and corners which can not be accommodated by folding, use Composeal’s Pre-Formed 3-way corner/curb protector (see fig 7). This versatile accessory helps to create neat corners in difficult details. Pre-Formed Corners are a must at curb and seat locations. Use seaming procedure discussed above to weld on corners/curb protectors. Corners must be applied in place (see figs. 8 & 9). .
TREAT DRAIN AREA and FLOOD TEST
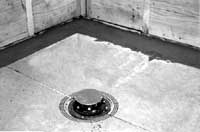
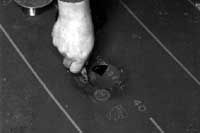
After pan is attached and all corners are secure, carefully locate drain hole, and trim for drain exactly to size of opening (see fig. 10). Do not trim out to bolt holes. Bolt holes should be pierced with a nail or punched to accommodate bolts with a tight fit (see fig. 11).
Lift pan to apply an even bead of Compotite Elasti-Seal under pan at bottom flange of drain (see fig. 12). Carefully join the two flanges and firmly bolt them together. Plug drain using a proper test plug and fill to flood level (top of curb) (see fig. 13). Let stand for 24 hours to determine that pan is well installed and undamaged.
PROTECT / INSTALL MUD BED
At this point, other trades may need to have access to the shower area to do their work(lathers, plasterers, or drywall). So be sure to protect the entire pan with heavy cardboard, plywood or drywall.
Visually inspect to make sure no damage has occurred. If you have any doubt, water test again. If a puncture is located, it may be patched with a small piece of Composeal.
Installation Details
1. Continuous blocking at base of studs.
2. Lay out and cut pan to size outside of shower stall
3. Weld both sides of seams with Flexible PVC Cement
4. Roll seams after cement becomes tacky

5. Nail (or screw) pan to studs or blocking
6. Fold corners and nail or screw “dog ear” to stud

7. Preformed corners in three corner/curb configurations
8. Apply Flexibe PVC cement to both sides of corner weld
9. Weld Pre-formed corners/curb protectors in place
10. Carefully trim pan to expose drain
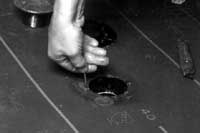
11. Pierce bolt holes with nail for tight fit. Do not cut!

12. Apply Elasti-Seal between pan and drain flange
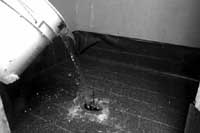
13..Bolt on top half of drain, plug drain, and water test
Tile work shall comply with recommendations of “Handbook for Ceramic Tile Installation” published by the Tile Council of America, Inc., P.O. Box 2222, Princeton, N.J 08543
Composeal Gold Installation Instructions
Normally I’m not all that fascinated or curious about this kind of thing, but your post has shown me the error of my ways. My thanks to you for taking the time out of your day to write about something like this.
Great blog. I very much enjoyed it! Exactly the thing I was looking for. Keep up the great work!
way to go.