Installation Instructions Chameleon Tile and Stone Registers
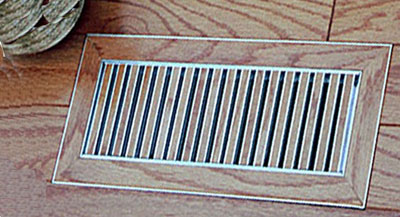
Chameleon Tile and Stone Registers
Visual Inspection
1. Check to ensure that the register opening is at least 1 inch away from a wall. Otherwise, the vent register will not fit without modification. If necessary, the register frame can be modified by trimming with a carbide saw blade on a table saw.
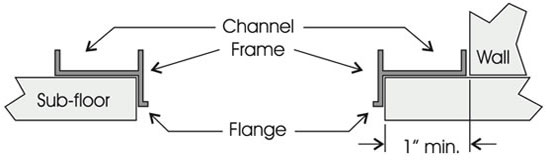
2. Make sure the register opening is not too large or small. If the frame flange does not fit into the opening, the opening is too small. If the frame has more than 1/2-inch of movement when the flange is placed in the opening, the opening is too large. If the frame fits too snugly in the opening, use duct tape to secure the sheet metal subfloor opening.
3. With tile or other flooring that is laid in small pieces, consider the location of the register in the layout of the floor. Planning layout of flooring around register should eliminate or reduce awkwardly shaped pieces

Installation
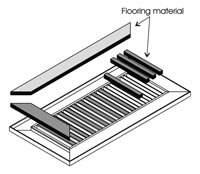
4. We recommend installing the registers frame first, then installing the surrounding flooring material. This ensures a tight fit of the flooring next to the frame. The frame, itself, can later be filled using scrap material left over from the flooring job. The cradle is designed to be free-floating to permit easy removal for cleaning or retrieving articles from the duct.
5. Before installing, make sure the subfloor around the vent is clean and level. Place the frame over the vent opening with the flange protruding down into the opening. Install the frame on the subfloor with the same adhesive used to secure the flooring to the subfloor.
6. Cut flooring material to fit into the channels of both the cradle and frame. Use a ceramic tile wet saw for ceramic and stone materials. Use a power saw with a guide for wood-type flooring. Use clear silicone adhesive to attach flooring pieces inside the Chameleon’s channels. Tile grout can be applied between the tile and frame, but do not grout between the removable cradle and frame, or the cradle will not be removable. For wood floors, fill any gaps with color-matched putty.
 7. The interior width of the frame is 1 inch, so tile or wood cut between 15/16’s and 7/8’s of an inch will fit nicely. How long to cut tile or wood pieces depends on the size of the vent register purchased, the size of the tile, the space of the gap for the grout and the design selected (see below).
8. After cutting tile or wood pieces for the frame, cut pieces for the cradle. The interior width of the cradle’s channels measures exactly .29-inch, so material cut 9/32’s of an inch will just fit. You will need 15 cuts for a 10-inch cradle, 18 cuts for a 12-inch cradle and 21 cuts for a 14-inch cradle.
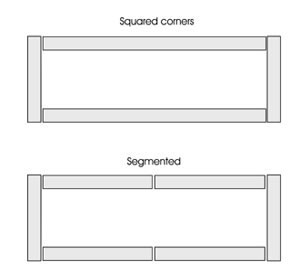
It’s necessary to use square corner segmented design with tile or stone when the length of the pieces is less than the length of the frame. If longer segment are desirable consider cutting the tile on diagonal.

Another approach is to use an accent piece at the middle of each segment. The accent piece can also be a different color if desired. The mitered corner design (at the top) is one of the most popular style.
I’m actually having fun with the design and format of your website. It’s an easy on the eyes which makes it way more pleasant for me to come right here and visit extra often. Did you rent out a designer to create your theme? Nice work!