Frequently Asked Questions Better Bench and Recess It
By Innovis Corp
Better Bench General Questions:
Can this bench really hold the weight?
Over 10 years of successful installations performed by professional contractors and homeowners alike provides a high level of assurance. This capability is achieved through the engineering of “shear force” rather than pull-out or “tension” loading. For instance, you may be familiar with the ease of pulling a fixture of some sort out of a wall when attached with hollow wall anchors in 1/2″ gyp board. Have you ever tried to push that fixture straight down? Our suggestion is to try one—you will be amazed!
How can I be sure?
Over 15 years of successful installations performed by professional contractors and homeowners alike provides a high level of assurance. This capability is achieved through the engineering of “shear force” rather than pull-out or “tension” loading. For instance, you may be familiar with the ease of pulling a fixture of some sort out of a wall when attached with hollow wall anchors in 1/2″ gyp board. Have you ever tried to push that fixture straight down? Our suggestion is to try one you will be amazed!
What do I fill it with?
A “dry pack” deck mortar is used to fill the bench. Do not use Thin-Set mortar! The mix ratio of the described mortar is 4 parts sand to 1 part cement- you may also use a pre-bagged mortar mix which is available at many of the tile locations that stock Better-Bench products, additionally, you will find this mix at lumber yards, hardware stores, under the common name of; mason mix, brick mortar, or deck mud. You will be adding just enough water to the dry mix to allow you to “chop” ( a garden hoe works best!) the mixture to consistency that allows you to pick up a handful and shape it into a ball without getting it all over your hands. Be sure to blend the mixture to the point that all dry powder pockets have been eliminated.
Then what?
Fill the entire bench with the mortar, and pack it tight as you go with a wood float, block of wood or even a steel trowel. Make sure the material is in all corners completely. Allow the mortar to build up about a 1/4 to 3/8 of an inch along the back wall(s) of the unit and screed it flush to the front lip to provide adequate drainage of the horizontal surface (this is not necessary in “dry” areas). Then add a small amount of water to the remaining mix to make it a little bit stickier. You will then apply this mix to the front face and screed it flush with the top and bottom edge of the channel. Allow the unit to set sufficiently prior to beginning your tile process.
Do I need to connect to wood studs or install blocking?
No! Better-Bench products are designed to meet a 400 lb load capacity by using the supplied hollow wall anchors. However, wood framing members may be encountered during installation, or the installer may just feel more “comfortable” connecting to framing. When this is the case, discard the hollow wall anchors and use the pan screws that are also provided.
What type of backing (substrate) do I need?
Better-Bench is designed to be mounted over any U.B.C. (Uniform Building Code) or T.C.A. (Tile Council of America) approved tile substrate.
The list includes such materials as:
- cementitious based substrates; Wonderboard, Hardibacker, Durarock or mortar bed installations,
- gypsum based substrates; Denshield, green board, or standard sheetrock (in dry areas),
- as well as over alternative mounting methods; Blanke Aqua Seal, Schluter Kerdi, ProPanel, Wedi board, or any other building code approved surfaces.
When should I install the bench, before I start tiling?
Better-Bench is an extremely adaptable system. You may install the product over the finish tile at any time. However, the optimum method would be to mount the product directly to the face of the substrate. This may be done before you begin tiling the wall, or for an additional advantage, you may begin tiling and then when you get to the course of tile where you wish to mount the bench, take a few minutes and mount the bench at this time. Then finish your wall tile and fill and tile the bench at the end (this method may save a few cuts of tile and eliminates the need to reach under the bench to lay tile)
Do I tile the bottom?
It is not necessary to tile the bottom of the bench. It is mounted down low and therefore the bottom is not visible. The alloyed aluminum will also not rust or corrode and leaves a smooth metal surface exposed that will not harbor mold or mildew growth and is easy to clean. You may tile the bottom, if desired, by using a metal bonding tile mastic or by simply screwing a piece of backer board substrate material to the bottom of the bench with galvanized flat-head screws.
Remember, you must leave the weep hole clear of any obstruction so that any penetrating moisture will be able to escape from the interior of the bench. Call us for additional recommendations if needed.
Do I need additional waterproofing?
NO! Better-Bench is designed to mount in a manner that does not require additional waterproofing membranes, nor will it compromise the membranes in the wall. Waterproofing is accomplished by injecting a small amount of caulk in the screw locations prior to their insertion. Additionally, you will apply a bead of caulk over the top most edge of the bench unit where it meets the wall. This will divert any moisture that has penetrated the grout anywhere above the bench line, into the bench itself, and away from the screw locations. Caulk may be added around the fastener heads inside the bench for additional assurance against water penetration at the screw locations.
All caulking is performed prior to applying the mortar!
Does the mortar eat away the aluminum?
Our products are produced of an “alloyed” aluminum which is engineered and suitable for a direct mortar contact. Etching of the aluminum does occur and is considered a normal reaction upon mortar contact. In some instances, usually if excessive moisture is allowed to penetrate the finished unit through grout transmission, or if the initial mix is to “wet”, this reaction may continue to cause unsightly staining of the aluminum. It is therefore recommended that the mix ratio and water content be carefully observed during installation, and that the tiled top surface of the bench, be sealed with a commercially available grout sealer. Generally, the sealers are recommended for all tile and grouted surfaces, are easily applied and relatively inexpensive to acquire.
Are the units A.D.A compliant? *
The physical size and shape of our adjustable bench model meets or exceeds A.D.A. minimum requirements. However- one aspect of the A.D.A. guidelines calls for the bench to be of a folding type. We are unsure as to the need for that particular aspect, and therefore recommend you check with your local building department for further information regarding A.D.A compliance issues and available variance options that may be available for your specific project.
* Note: A.D.A. compliance is not generally a requirement for residential construction.
Frequently Asked Questions – Better Tray
What is the weight limit?
The BT-17 has a 100 lb live load capacity do to the amount of fasteners supplied with the unit and based on a retro-fit or over the tile method of installation. The capacity can be substantially increased by installing additional fasteners and/or mounting the unit directly to the face of the substrate.
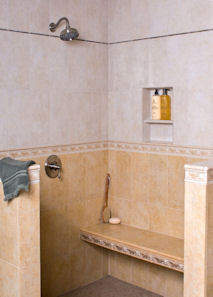
Can I then use this unit for a footrest?
Yes. We are aware that many clients are installing the bt-17 low for that very purpose. It is best to mount the unit to the substrate first if this is at all an option, otherwise you will need to install 3 additional fasteners (not supplied) that meet or exceed the shear value of the fasteners that we supply. Call for additional details if necessary. You will also need to tile the bottom of the BT-17 when mounted low do to the exposed mortar. This mortar may harbor mildew or mold growth if not covered.
My shelf is high and the bottom is visible. How do I tile it?
The BT-17 was anticipated for a higher mounting location than our bench products. It has therefore been designed with a series of 1/2″ holes completely perforating the bottom of the unit to make it easy to tile. You install the bottom tiles using standard thin-set or mastic which will adhere via the direct bonding path to the exposed mortar in these holes. Grout and seal as normal.
TIP
When applying the mortar to the BT-17 you will need to use a “back-up block” under the unit to keep the mortar from falling through the holes. This can be any piece of scrap wood or a wood float/trowel held in one hand while you fill the unit with the other. Brush off excess mortar from bottom of unit after mortar installation to provide even surface for tile.
Recess It General Questions:
Won’t the flange cause a bump in the tile?
The waterproofing flange is an important element that is unique to the Recess-It product line. It serves an important role in maintaining the waterproofing integrity of the wall. It is approximately 1/16 of an inch in thickness. It may cause a “bump” issue if not addressed properly. There are two basic methods available to minimize the thickness of the flange.
1. You can simply “feather” the edge of the Recess-It unit for a width of eight to ten inches by using the bonding material (thin-set or mastic) of the project and the smooth side of the trowel. Spread the bonding material around the entire perimeter of the unit after installation and allow to skin prior to setting tile.
2. If you are using a cementitious based substrate, you may flush set the unit by grinding down the substrate a 1/16 of an inch for the full width of the flange prior to unit placement.
3. If you are installing in fresh laid mortar place the bead of caulk on the back of the mounting flange and just press the unit into the mortar before it sets completely.
Do I have to install horizontal blocking?
It is not required to install horizontal blocking. The aluminum shell is structural and the supplied screws are designed to pull the substrate snug against the back of the mounting flange which will adhere it to the caulk placed on the back of the flange. You may easily add horizontal blocking if desired by placing the blocking after the cut-out for the Recess-It unit has been made. Secure each block in place with two (2) galvanized countersunk screws (1-5/8 galvanized gypsum screws work great!) placed at each end of the cut out under the mounting flange. The screws locations will then be covered and waterproofed by the mounting flange after final unit placement.
The bottom slope seems excessive. Why is that?
Recess-it products have a preset slope to ensure that any grout penetrating moisture can not be retained inside the unit and cause mold and/or mildew development. The slope can actually be minimized by building up the thin-set or mastic thicker in the front to accommodate your specific installation need. Remember not to adjust the slope to the degree that it slopes toward the rear of the tiled unit.
You mention caulk in the instructions. Why?
A bead of caulk must be installed on the back of the mounting flange prior to unit placement. Any caulk may be used for this purpose since it is merely to act as a waterproofing gasket between the substrate and the unit.
Are Recess-It products waterproof and why don’t I need additional vapor barriers or water proofing membranes to protect the wall
Recess-it units are made of a structural, alloyed aluminum shell with a sprayed on elastomeric/waterproofing coating. The shell backing, eliminates the possibility of membrane penetration, and the units vertical mounting and positive sloped bottom ensures no damming of water inside the unit causing any potential for leakage-period!
The variation of temperature between the air trapped in the wall cavity and the water from the shower head can cause condensation to develop where the temperature clash meets a solid surface or barrier such as waterproofing membranes, or non-breathable surfaces. The unique design of the Recess-It units allow it to be installed without any direct wood to unit contact. This eliminates any moisture buildup which can destroy the wood framing of the wall over time. The preset slope on the top and bottom of the Recess-It is also designed to route any possible condensation buildup on the shell to the lower front flange and away from fungus susceptible wood members either by direct contact or “drip off”.
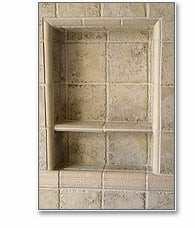
What’s the “floating shelf”?
The floating shelf is a 1/16 inch thick, aluminum reinforcing unit, which is completely perforated with 1/2″ holes. The shelf, when combined with surfacing tiles top and bottom, and the final grout, provides a structurally reinforced tiled shelf at the location the installer desires rather than a pre-set location dictated by the product manufacturer!
The floating shelf unit is sized to fit within the grout joint of the vertical wall tile placed inside the Recess-It. This allows the installer to align the shelf with the existing layout of the wall tile without compromise, time consuming tile cuts, or layout issues.
The floating shelf unit may be used with any Recess-It product. Even the 614 when mounted vertically (ideal for a leg shaving foot rest), can use the floating shelf for a divider (razor rest!) just by easily cutting the shelf piece in two with aviation/tin snips.
How do I bond the tiles to the shelf?
Standard thin-set or mastic is used to bond the tiles to each other rather than directly to the shelf. The 1/2″ holes allow the bonding material from the tiles on one side of the shelf to penetrate the shelf and bond directly to the tiles on the other side of the shelf. This effectively causes the shelf to be “sandwiched” between the tiles which then acts as the reinforcing layer of the shelf once the grout completes the installation.
What type tile do I use on the shelf?
The easiest and most preferred trim tile for the shelf is “SBN” or surface bull nose tile. Many tile lines do not include SBN tile as a part of their standard trim selection. In these instances, you may choose to “back cut” the field tiles on a 45˚ and use a 1/4″ round trim piece for the front edge. Another method you might consider is to thicken the shelf with a piece of cement board substrate material and use a coordinating accent tile across the front.
What if I wish to place the shelf in position other than where a grout joint exists?
This may be accomplished by cutting the tiles inside the Recess-It unit where you wish to place the shelf. A wet saw is best for this purpose since the thickness of the blade will cut a joint through the tile to receive the floating shelf without causing the tile lines to move up the distance of the shelf material.
Is the shelf really strong enough to support anything?
If you have only just tiled the unit it will feel a bit flexible in the middle and leave you wondering about what it can support. However, once the project has been fully grouted and allowed to reach its full cure (usually 24 hours depending on grout manufacturer) it will be sufficient in strength to hold all standard toiletry items.
The grout also plays a key role in holding the shelf in its final position inside the Recess-It. Be sure you check centering of the shelf during grouting to insure final placement!
Recess It how to Install – Read