Hand colored Glass Tiles Care and Installation Instructions
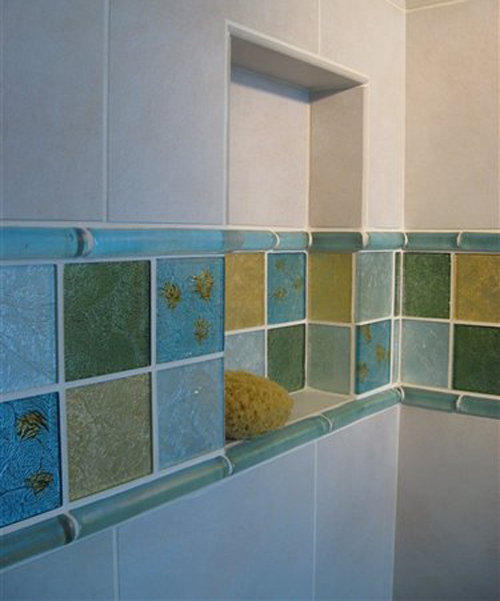
1. Aussie Dream Glass is made of clear glass with a foil backing. Each piece is colored by hand so each piece is different.
2. Five of the colors have color highlights, the remaining colors do not.
3. The color highlights are random on the five colors.
4. Some colors are V2 in shading and some are V3. Make sure the product is inspected by the end user before installing to avoid any issues. No refunds or adjustments of any kind will be made by International Flooring Center, inc. / FlooringSupplyShop.com after the product is installed.
5. Aussie Dream Glass may be installed on interior wall areas, in wet or dry locations, and on floors in light traffic areas, such as a bathroom or powder room in a home. It can also be used as an insert around the edge perimeter of a room. High traffic areas such as entrance halls are not recommended. It can be used in most vertical commercial installations. Also see ANSI 137.1
6. Do not use sizes larger than 4×4 on the floor due to it being slippery.
7. Glass can scratch, especially on floors.
8. Use a tile wet saw with a diamond blade designed for cutting glass. Target, Pearl, MK, and many other blade manufacturers make specialty blades for glass tiles. Always wear eye protection.
Limitations Do not use in pools, outside, on kitchen counters, or in steam showers.
Suggested Installation Method
1. Always use a licensed contractor.
2. Always confirm in person with the end user / specifier that the product being installed is the correct product before installing it.
3. Always inspect all of the product for unintended flaws that are not part of the fashion or style of the product. Do not install defective product. If there is a question about the quality of the product contact your supplier before proceeding.
4. Make sure the substrate is suitable for glass. Choose and follow the best technique for your project.
5. TCNA handbook, page 10. And all pages pertaining to substrate preparation. ANSI A108.1B, A108A2.1.8, C1396, C1396M-04 Make sure crack isolation membranes and water proofing membranes are considered for your type of installation.
TCNA handbook, page 9, 10 ANSI a118.10, A108.12
6. Glass expands and contracts differently than ceramic / porcelain tile. Make sure expansion joints and movement joints are considered and used when necessary. Keep this product over eight inches away from an open flame. Areas of concern would be fireplace surrounds and backsplashes behind cook tops. Extra soft joints may be required in these high heat areas. Use a soft (caulking) joint between the glass and any other material in a continuous installation. Use a soft joint where two different planes come together. Use a soft joint every 6 feet in a continuous run, or according to the TCNA handbook. Use a soft joint where the glass abuts to plumbing fixtures, cabinets, counter tops, window or door moldings, and bath tubs in accordance with the TCNA handbook. TCNA handbook, page 8, 9, 68, 69, and EJ171-05
7. Use a flexible modified white thin-set mortar that meets or exceeds ANSI 118.4 (a flexible acrylic mortar system such as those from Mapei, Laticrete, TEC, Customs, CCure, Siena, or equivalent). Follow the manufacturer’s instructions. Organic Mastic and Epoxy are not recommended for Aussie Dream Glass.
8. Use the correct size notch trowel depending on the size of the product and your desired results. In most cases a 5/32 x 5/32 v-notch trowel will be used. Smooth out the ridges in the thin-set with the flat side of the trowel to create a flat bed with no lines in it to set the glass into. Make sure you achieve full contact between the back of the glass and the thinset; you may use a clean grout float to embed the glass. Do not allow the white thin set to rise up in the joints when using colored grouts.
9. Because this is a “fashion on the back style” of glass it has a clear edge. In some cases after the installation you may be able to look thru the surface of the tile and out thru the edge and see the union where the thin-set and grout meet. This is a characteristic of all “fashion on the back” glass regardless of the manufacturer. If this is a concern, using white grout will blend with the white thin-set. You can always do a test installation with a few pieces before proceeding. An example of a temperamental installation would be black glass with black grout and white thin-set. If a dark colored grout is desired gray thin set might be a better choice for the adhesive.
10. Allow the thin-set to cure according to the manufacturer’s instructions. 11) Use a modified grout. Grout with flexing capabilities or a flexible additive is preferred.
11. Sanded or non-sanded grout may be used. When using sanded grout, be careful to not scratch the glass. Perform a test to see if the grout will scratch a loose piece of glass before proceeding with the installation.
12. Read and follow all manufacturer’s instructions on the grout.
13. Buff and cure the grout according to the grout manufacturer’s instructions. Once the grout is cured, you may seal it. The glass does not need to be sealed.
Care and Maintenance
Regular cleaning with a mild bathroom cleaner or window cleaner and a soft cloth or sponge according to the manufacturer of the cleaner is recommended. Buff dry with a soft cloth. Do not use acids, corrosive, or abrasive cleaners.
We hope this will give the installer an avenue to become and stay educated with the most current recommendations. Please refer to the TCNA hand book regularly because it is revised each year and techniques can change. Our goal is to have trouble-free long lasting installations that can be enjoyed for a lifetime. Use constitutes acceptance, there will be no credits, refunds, cash settlements, and etc. made after the product is installed regardless of the circumstances. The TCNA website is www.tileusa.com .
A Step by Step Guide to Installing Your Tile – Caring for Metals Tile and Trims – Ceramic Tile Flooring Care and Maintenance – Tile Guidelines – Important Information on how to purchase Tile – Caring for Natural Stone – Caring for Metals Tile and Trims
howdy I’m from Germany and my English isn’t that astounding, but i was ready to figure out every sentence of one’s content. I’m searching English internet sites to boost my English knowledge and I’m awfully glad to finally discover a journal, that publishes clear and structured English i can recognize. Many thanks from Germany!
When cutting glass tile pieces, you should try to use a glazier’s tool and glass nippers to help cut odd sized shapes from it. Use a wet saw with a diamond blade if you are working with large glass tiles.